- Getting started
- How does it work
- How to set up KNX connection
- How to change profile type
- Licenses and Apps: iBEMI and iBEMI Light
- iBEMI Profile Editor: How to create your profile
- iBEMI Styles
- iBEMI Monitor
- Demo Mode
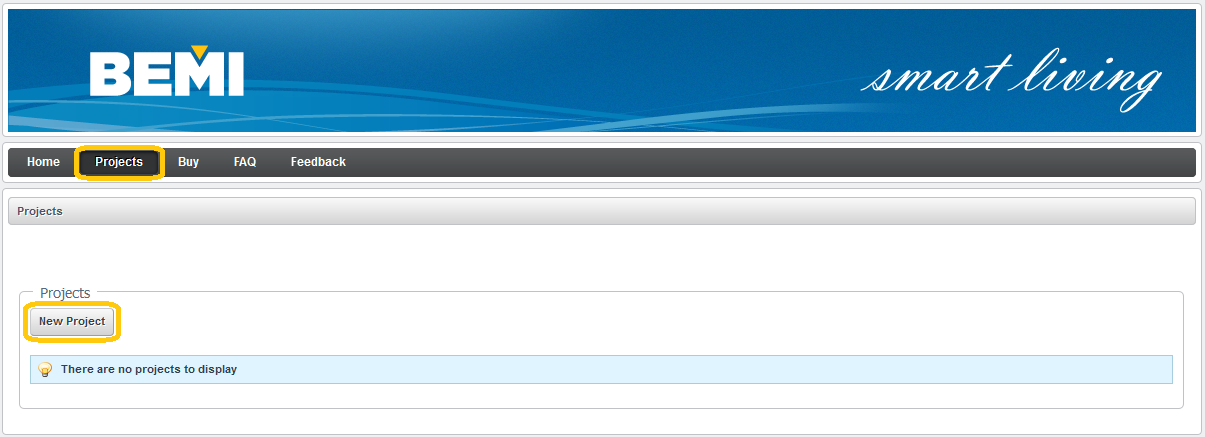
Getting started
Step 1: Ceate a project with necessary data
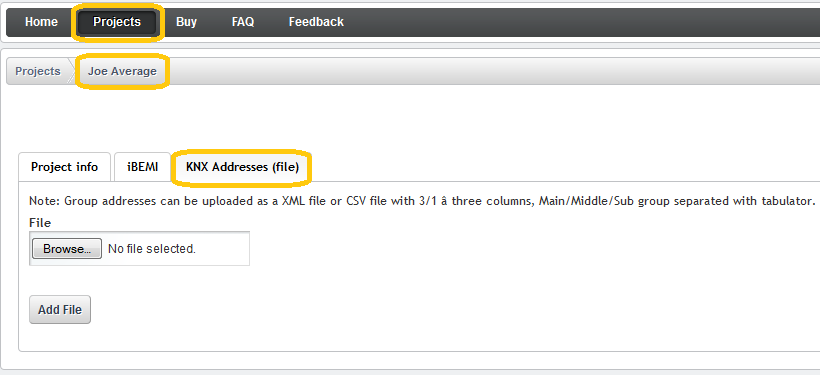
Step 2: Upload your KNX group address list
- Select the KNX Addresses (file) leaf in the project view
- Export the Group addresses in ETS (3 levels, ….)
- Upload the file to the iBEMI configurator
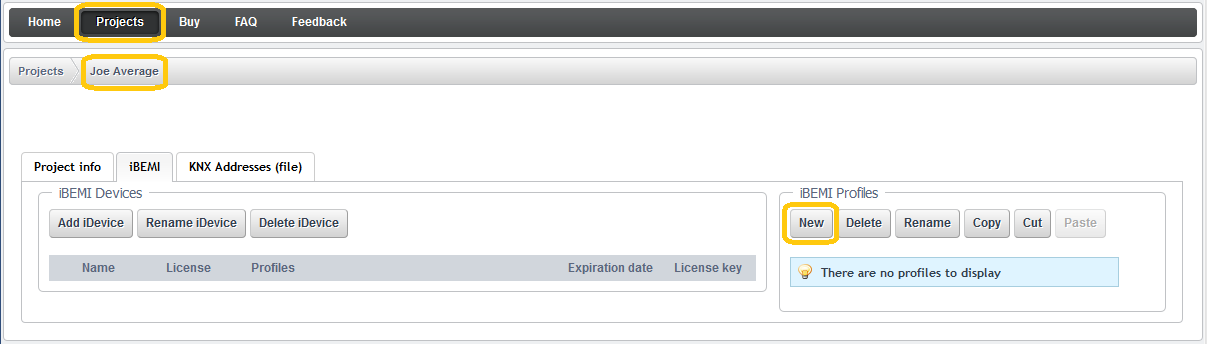
Step 3: Create your profile
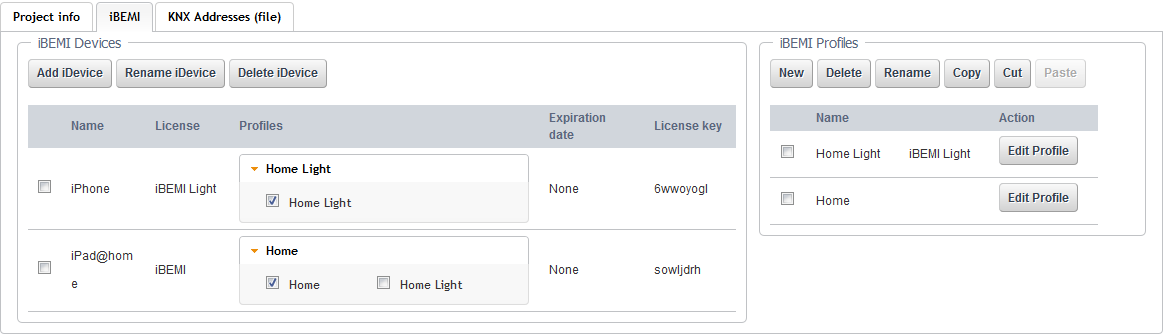
- In the iBEMI leaf: press the "New" button in the [iBEMI Profiles] section and give your profile a name e.g. the house owners Surename
- You can select which type of profile you want, an iBEMI or iBEMI Light profile. See differences in Licenses: iBEMI and iBEMI Light
- Click button Edit Profile to open your profile in iBEMI Profile Editor. See iBEMI Profile Editor: How to create your profile for further information.
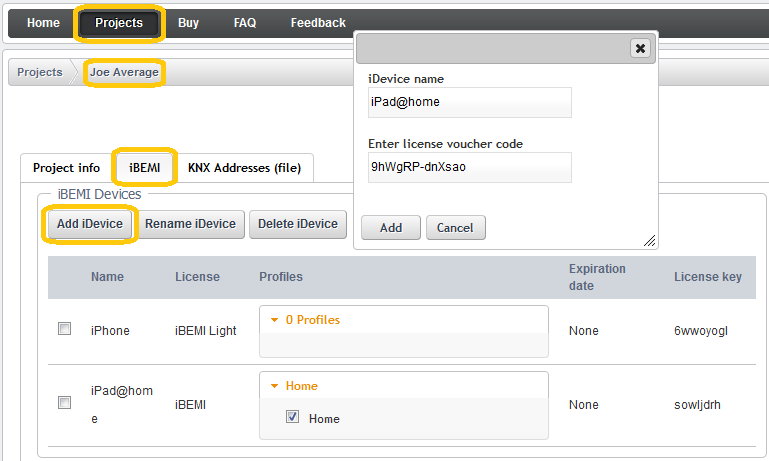
Step 4: Add an iDevice to your project
- Select the iBEMI leaf in the project view
- Press the "Add iDevice" button
- iBEMI: for iDevices runing the iBEMI app press the iBEMI button in the pop-up window, give your device a name like iPhone or iPad@home, fill in the voucher code and press "Add"
- iBEMI Light: for iDevices with iBEMI Light app press the iBEMI Light button, enter a name for your iDevice and add it
Step 5: Sync iBEMI iDevice and project
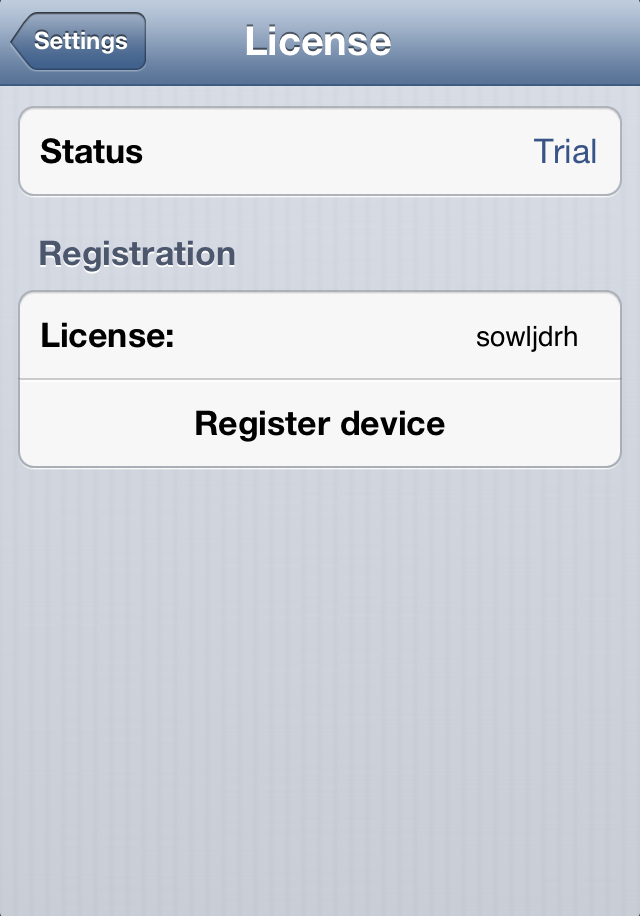
- in the iDevice that you want to use with that project, open Settings (by pressing the respective button in the upper left corner on starting page)
- navigate to section License, enter the license key of the iDevice and press "Register device"
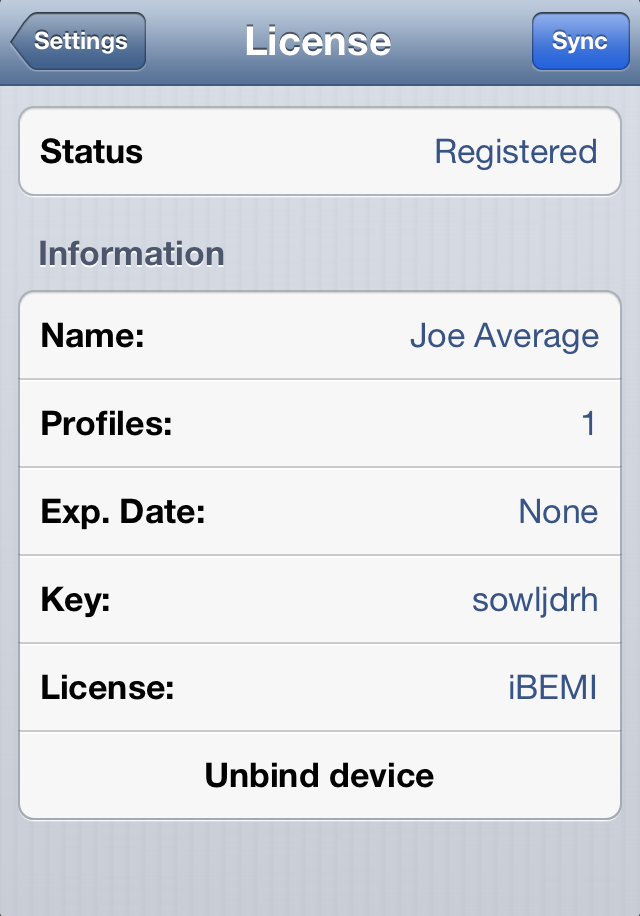
- the device is now registered and you are able to load all the profiles of your online project
 |  |  |
How does it work
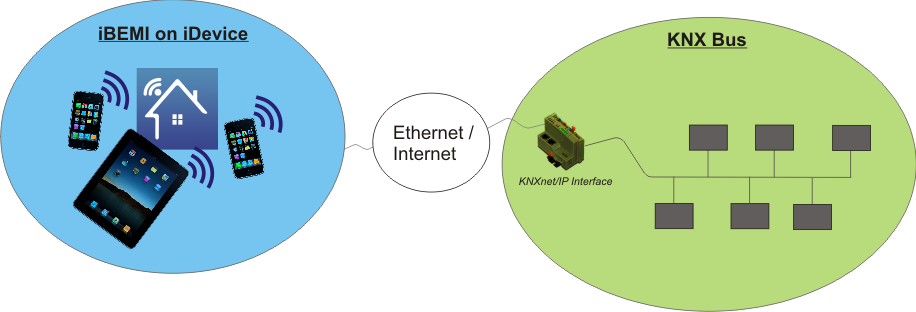
Communication: iBEMI connects directly to KNX Bus through KNXnet/IP Gateway. Both connection types, KNXnet/IP Tunneling (including remote connections) and KNXnet/IP Routing, are supported.
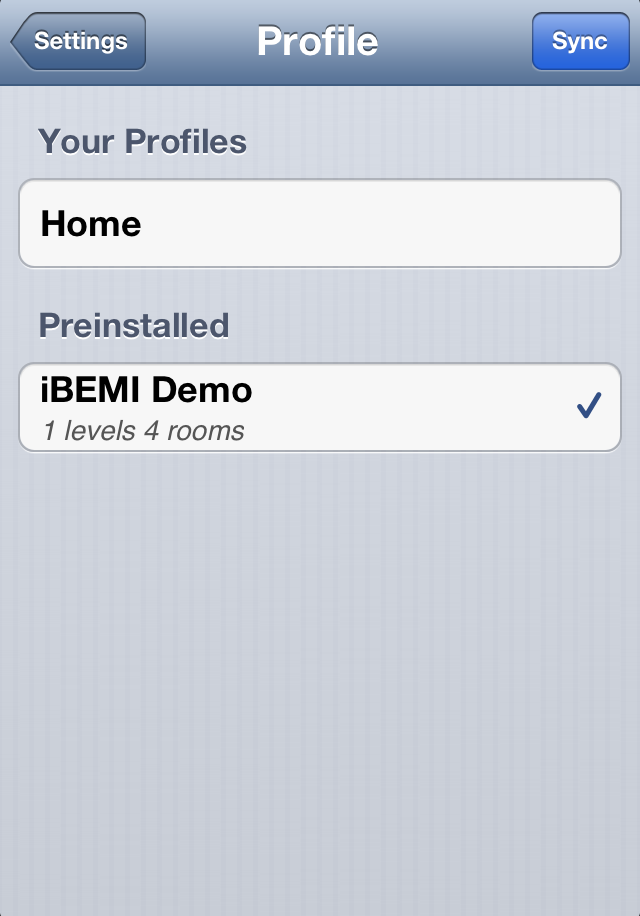
Managing iBEMI: You are able to create custom profiles for your projects with the iBEMI Profile Editor. To transfer profiles to the app, you need to purchase a license for the iDevice which is running the app. After entering the license key in the app, iBEMI is synchronizing data of your project and you are able to load the custom made profiles. Once your iBEMI iDevice is registered, you can easily synchronize it with your account by pressing "Sync" button in "License" or "Profile" section.
How to set up KNX connection
You find the set up for KNX connection in Profile Settings on first page (root element in Pages treeview) in iBEMI Profile Editor. For the primary connection you can either select KNXnet/IP Tunneling or KNXnet/IP Routing. If your tunneling connection is a remote connection (that means you connect to the KNX Gateway via WAN/Internet), you have to to check NAT attribute.
For connection type KNXnet/IP Type you could set a custom port, for KNXnet/IP Routing you could set custom Multicast IP address and custom port. Usually you would not change these default values though.
In section Remote Connection you are able to set up an (optional) alternative connection. If establishing primary connection fails, iBEMI will try to connect KNX through this connection. If both connections fail, iBEMI will throw a connection warning and it will try connecting again (first primary, then alternative connection) after 20 seconds. Note: The alternative connection is used only, if connecting to primary connection failed. For KNXnet/IP Tunneling this is the case when the Gateway did not reply (timeout). However, if the Gateway replies and is giving negative connection response (if there is no open channel for instance), the alternative remote connection is not used in this case. For a primary KNXnet/IP Routing connection the remote connection is used if the device is not connected to WiFi (Ethernet). In the iBEMI Settings you could also set Connection Mode opton to Remote. In this case iBEMI will only use the alternativ remote connection you configured in this section.
Please note that the IP Addresses/Urls you enter are not verified. However, when you load the profile, iBEMI will throw a warning if the connection data is invalid.
How to change profile type
There are two different profiles types available for the App: iBEMI and iBEMI Light. If you create new Profile, there is the option "Create iBEMI Light profile" to create a profile which is compatible with iBEMI Light license (see Licenses: iBEMI and iBEMI Light). You are able to easily change profile type afterwards in iBEMI Profile Editor in Profile Settings on first page (root element in Pages treeview).
Licenses and Apps: iBEMI and iBEMI Light
There are two different license types available: iBEMI and iBEMI Light. The full license version (iBEMI) is purchased from the local KNX installer or directly from us and is used together with the iBEMI APP. The light license version (iBEMI Light) is already included in the iBEMI Light APP when purchasing it from the App Store.
The two license types differ in the profiles you could use with them. An iDevice with iBEMI Light license is limited to keep one profile at a time. Furthermore there are also limitations in the size of iBEMI Light profiles. You are able to add up to 89 KNX widgets to an iBEMI Light profile. There are also limitations for the full license, iBEMI. However, these limitations (defaultly you could place more than 5000 widgets - ask if you need more) shouldn't be relevant in common usage. Please contact us if you are struggling with iBEMI limitations.
| Limitations | Profiles | Levels | Extension pages | Sub pages | Number of widgets |
|---|---|---|---|---|---|
| iBEMI | 10 | 12 | 4 | 5 | > 5000 (as default - extendable on request) |
| iBEMI Light | 1 | 1 | 1 | 0 | 89 |
If you are not sure, whether your custom profile exceeds iBEMI Light limitations, we recommend to first create an iBEMI Light profile, to test if its size is sufficient. You are always able to easily change profile type to iBEMI in the iBEMI Profile Editor in Profile Settings. Profile settings are accessed by clicking root element in the treeview of Pages section.
iBEMI Profile Editor: How to create your profile
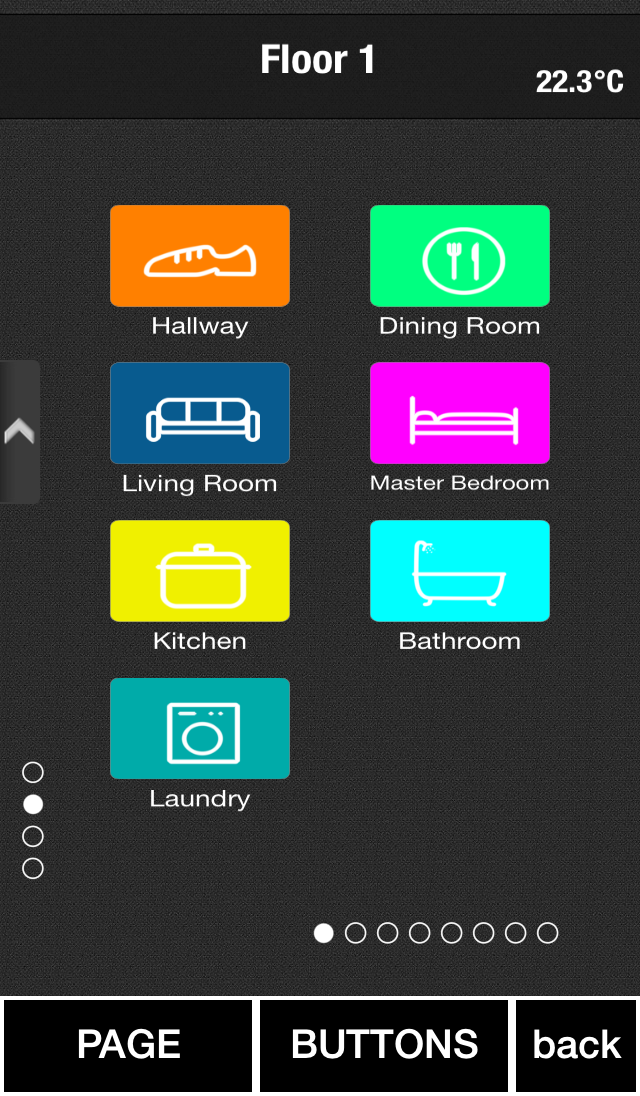
| Pages | On the left side you have the box Pages with the treeview where you can see the page layout of your profile. | ||
| I. Add a level and change the name to e.g. Floor 1, this page will be accessible in the iphone by scrolling down from the main view. II. If you add an extension page it will be the page to the right, this page will be accessible in the iPhone by scrolling to the right from the main view. | |||
| You are able to move Levels and Rooms in the treeview by Drag&Drop. | |||
| Attributes | In the middle you have the Attributes box with a list with all the configurable pramaters for the selected widget (as name, knx addresses etc.). There are "More Settings" option available for most widgets with optional attributes. Usually you don't need to configure these additional attributes. | ||
| Application preview | On the right side you have the Application preview with landscape and portrait view of the selected page. Most time you will work with the big landscape preview. You are able to add buttons/widgets by pressing an open spot in the page and to select buttons/widgets to change their attributes. On all the pages you are able to add/select buttons, value label and name label in header of the page. In addition to that you could configure the two custom symbols in the upper left corner on the first page (and its extension pages). Furthermore you could move buttons to another spot in the page by Drag&Drop. You could do the same in the small portrait preview on the right side to create a different button layout for the page in portrait orientation. | ||
Steps to build up your profile:
- If you open a new profile in the iBEMI Profile Editor by clicking Edit profile button, you will see one empty page with the chosen profile name in preview window. In Attributes box you will see Profile Settings. First thing that you should do is to configure KNX Connection according to your installation.
- Then you could go ahead and configure the content of the page to your needs: add buttons, add a value in upper right corner and you might also want to configure the header symbols.
- First page is now finished. Now you are going to add a new page. There are two options: if you want to add more buttons with kind of a global function which should be quickly accessible, you should add extension page(s) to the first page by pressing button Add Extension Page in Attributes box. Second option is to add a level page by pressing Add Level button in Pages box to start building up Level-Room structure of the profile.
- With extension page: proceed as with first page. On extension pages you are able to add up to 8 buttons. After finalizing the page you could again add another extension page or you could add a level page.
With level page: usually you will add rooms to a level page by clicking Add Room button in Pages box. If you add a room, there will be a new room page added to the treeview in Pages box and you will see a button appearing on level page. This button is a Room Link button. If you press this button in the app, you will be navigated to the room page which is always placed to the right of the level page. If you create a new room, you should configure Room Link button (set name of the room, select an icon and maybe secure the room with PIN) and press the button afterwards to save selection. You could also add a conventional button to level page by clicking an open spot on the page and configuring button to your needs. You could set value lable for level page too. - After creating room pages you could now add content by selecting them in treeview in Pages box and adding buttons and setting a value lable for each page. If you would like to add more buttons to one room you could add extension page(s) by pressing button Add Extension Page. In the app extension pages of a room are placed beneath the first page of the room. They share the same name as the room page but besides that they can be configured independently from room page.
There are limitations for the size of the profile. However, with iBEMI license they shouldn't be relevant. Check Licenses: iBEMI and iBEMI Light for further information.
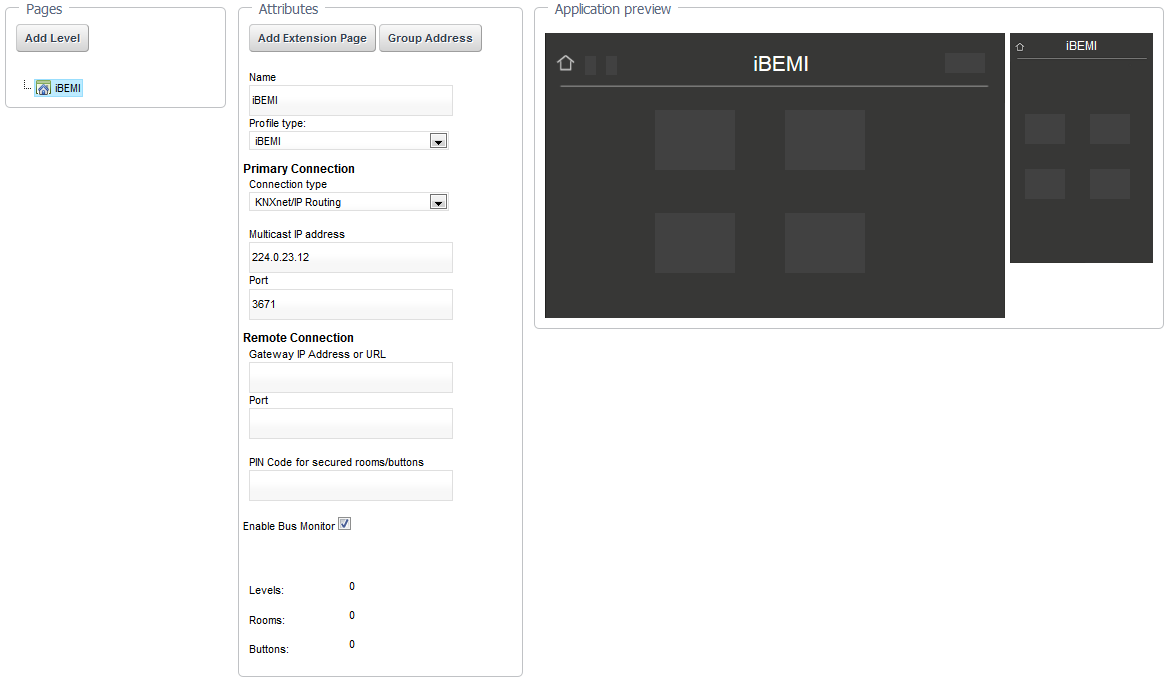
Profile Settings
Profile Settings contain general attributes of the profile. You access them by pressing the root element (that is first page) in the treeview in Pages box.
| Attributes | ||
| Name | This is the name of the profile which is also shown in the header of first page (+ extension pages) of the profile | |
| Profile Type | At this drop down menu you are able to change profile type. An iBEMI profile is compatible only with a device with iBEMI license, an iBEMI Light profile is running on devices with either iBEMI license or iBEMI Light license. | |
| Primary Connection | ||
| Connection Type | You could choose either KNXnet/IP Routing or KNXnet/IP Tunneling. If you choose KNXnet/IP Tunneling you need to also set the address of your gateway in the appearing textfield. | |
| Gateway IP address or URL | Here you need to set the IP address or the URL of the gateway which the app should use to build up KNXnet/IP Tunneling connection. | |
| Multicast IP address | You could set a custom multicast IP address which the app should use with KNXnet/IP Routing for this profile. Default IP address is: 224.0.23.12 | |
| Port | You could set a custom port here that the app should use with KNXnet/IP connection for this profile. Default port is: 3671 | |
| NAT | Only relevant with KNXnet/IP Tunneling. If you want to connect to your KNX Gateway via WAN (through Internet), you need to set this attribute. Defaulty it is not checked since it is more common to connect your Gateway in the local network. | |
| Remote Connection | ||
| Gateway IP address or URL | Here you need to set the IP address or the URL of the remote gateway which the app should use to build up the alternative connection. If connecting primary connection fails this connection is used. | |
| Port | Port for alternative connection for this profile. | |
| PIN Code for secured rooms/buttons | iBEMI has the Secure PIN feature to secure certain rooms and buttons in the profile. Here you are to able to set your PIN. The PIN can be easily changed in the iBEMI Settings later. To secure buttons and rooms you have to check PIN Secured option in their attributes under More Settings. | |
| Enable Bus Monitor | iBEMI includes a powerful KNX Bus Monitor. With this attribute you can choose whether the Bus Monitor should be available with this profile or not. Defaultly this option is set. |
Secure PIN
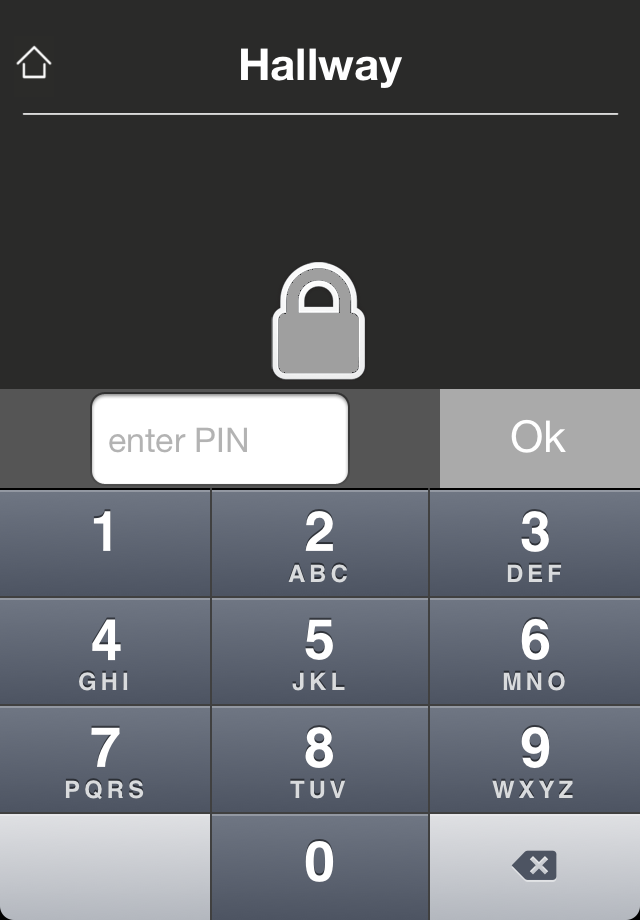 | Starting from v1.02 iBEMI offers the Secure PIN feature to avoid unauthorised access to profile functions. Users need to enter a PIN to get access to these protected buttons/rooms. Ones the PIN is entered the profile is unlocked and the secured functions can be used. When the iBEMI App is send to the background or closed, the User again would have to enter the PIN to unlock the profile. The PIN which is used for a profile is set in Profile Settings. However, it could be easily changed later on in the App Settings in Change PIN section. A button is secured by checking PIN Secured option in its attributes under More Settings. For rooms you find this option at the Room Link button on the level page. Note that the PIN is restricted to digits for iPhone/iPod - iPad allows alphanumerics. |
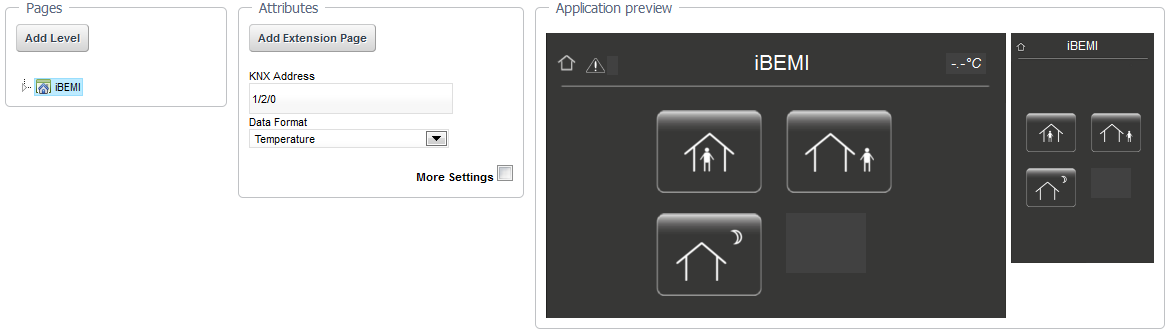
Value Label
 | The Value Label is placed in the upper right corner on each page in the App. In the iBEMI Profile Editor it is configured by pressing the corresponding field in the preview of the page. You can choose from several different Data Formats in the attribute box. The Value Label has to be configured according to the chosen Data Format. You find all the possible parameters for the different Data Formats in the following table. |
| Attributes | ||
| KNX Address | At this parameter you have to enter the KNX group address of the desired value.Format of the address has to be Main/Middle/Sub group and the address is polled when you enter this page in the app. | |
| Data Format | At this drop down menu you are able to choose the Data Format of the desired value. Temperature, Brightness, Windspeed, Energy, Power, Time, Date, Text, 1 byte, 2 byte, 2 byte float, 4 byte, 4 byte signed and 4 byte float are the available Data Formats. | |
| More Settings | ||
| Unit | You could set a Unit which is shown with the value in the app for all Data Formats except Time and Date. There are default Units for Data Formats Temperature [°C], Brightness [Lux], Windspeed [m/s], Energy [kWh] and Power [W]. | |
| Scaling factor | If Data Format is 2 byte float or 4 byte float, you could set a custom scaling factor for the value at this parameter. This is optional. The default value is 0.01 for Data Format 2 byte float and 1 for Data Format 4 byte float. | |
| Decimal places | For Data Formats Temperature, Windspeed, Power, 2 byte float and 4 byte float you could set the number of decimal places of the value that should be displayed in the value label. Defaultly there is one decimal place shown with the respective Data Formats. | |
| Time Format | You could select a custom format for the shown time. The default format is E HH:mm. | |
| Date Format | You could select a custom format for the shown date. The default format is d.MM.yyyy. |
Header Symbols
 | There are two symbols in the upper left corner which you could control through a 1bit KNX Address. Configuration of this symbols is very simple: you just need to click a symbol in the preview and choose an icon and set the KNX Address which status the symbol should adapt to. The KNX Address is polled to get the current status so the address should be set as readable in ETS. |
Buttons
You can place up to eight buttons on each page, except the first page of your profile: here you could place for bigger buttons.
A new button is created by clicking on an empty button spot in the page preview. The new button is a copy of the latest modified button and it is placed on the selected spot. You delete a button by selecting it and clicking button Delete in the Attributes box.
You are able to change the position of the button through drag and drop in the preview windows. You could select different positions for the buttons for landscape or portrait orientation.
To avoid unauthorised access you are able to secure each button with a PIN. You find this option PIN Secured under More Settings of each button. If a button is PIN Secured, you need to enter a PIN when you press the button to unlock the profile. The PIN is set in Profile Settings and can also be easily changed in iBEMI App Settings later.
iBEMI offers you a wide range of different button functions. The button function is set at the entry Function of button in the attribute box. In the following you find all the information to the available button functions of iBEMI.
Switching
 | Buttons with function Switching should be connected to a KNX switch actuator. You can select 1bit commands (ON/OFF/TOOGLE) that should be sent on button press or/and button release. The button could show the current status of the connected actuator. The button is adapting state from KNX group address which is entered at entry KNX Address for status indication. This feedback address could be polled - if polling is chosen, KNX Address should be set as readable so that current state could be fetched by the app. |
| Attributes | ||
| Name | Name that should be shown beneath button. | |
| KNX Address | At this parameter you have to enter the KNX group address of the 1bit actuator you'd like to control. | |
| Command on button press | You can choose which action should be performed on button press. Available actions are No function, ON, OFF and TOGGLE. No function is initially set. | |
| Command on button release | Here you can choose which action should be performed on button release. For this button action is usually performed on button release. Available actions are No function, ON, OFF and TOGGLE. No function is initially set. | |
| KNX Address for status indication | Here at this parameter you enter KNX group address to indicate status of the 1bit actuator. There is a checkbox to set whether this address should be polled or not. Note: If this KNX Address should be polled, the address should be marked as readable in your ETS project. | |
| Icon | Select icon that should be shown on button. | |
| More Settings | ||
| Icon for active state | Here you could select another icon that would only be shown if status of button is ON. You could also set another KNX address at the field below to control the icons. | |
| KNX Address for controlling the icons | Usually the icons of a button are set according to its status (that is the value at "KNX Address for status indication"). However, if you'd like to control icons independently from status, you could set a special KNX Address (1bit value) here to control the icons. There is a checkbox to set whether this address should be polled or not. Note: If this KNX Address should be polled, the address should be marked as readable in your ETS project. | |
| PIN Secured | Check this option to avoid unauthorised access to this button. If the Secure PIN option is set, you need to enter a PIN before you could use the button. The PIN is set in Profile Settings and can also be easily changed later in iBEMI App Settings. |
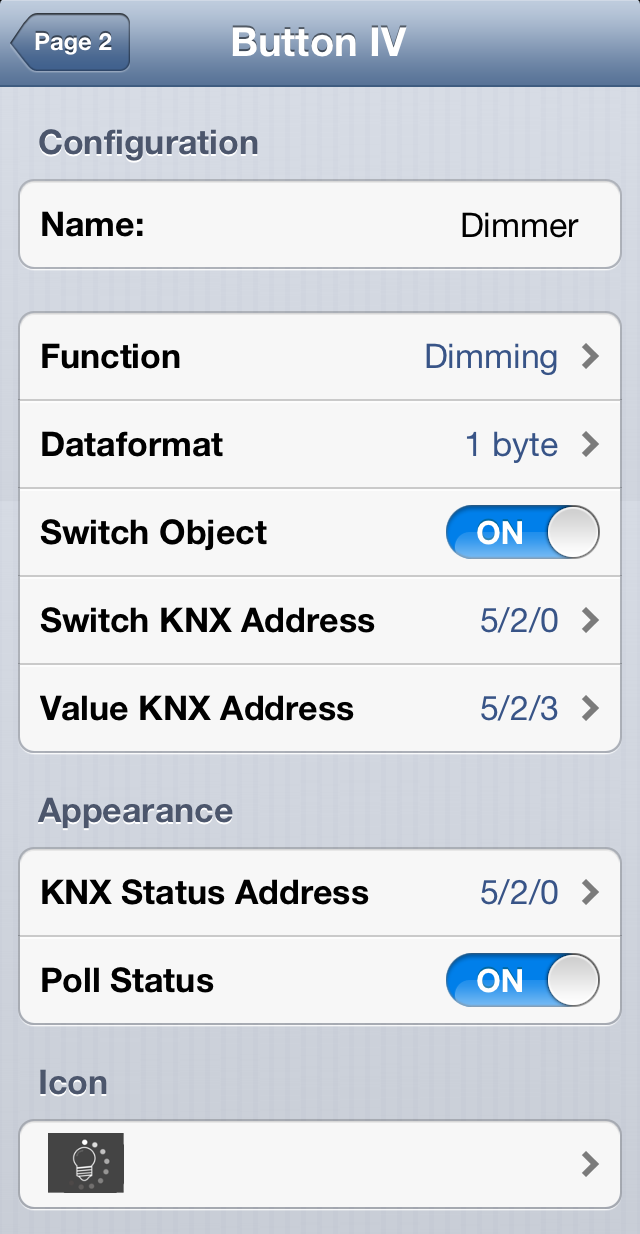
Dimming
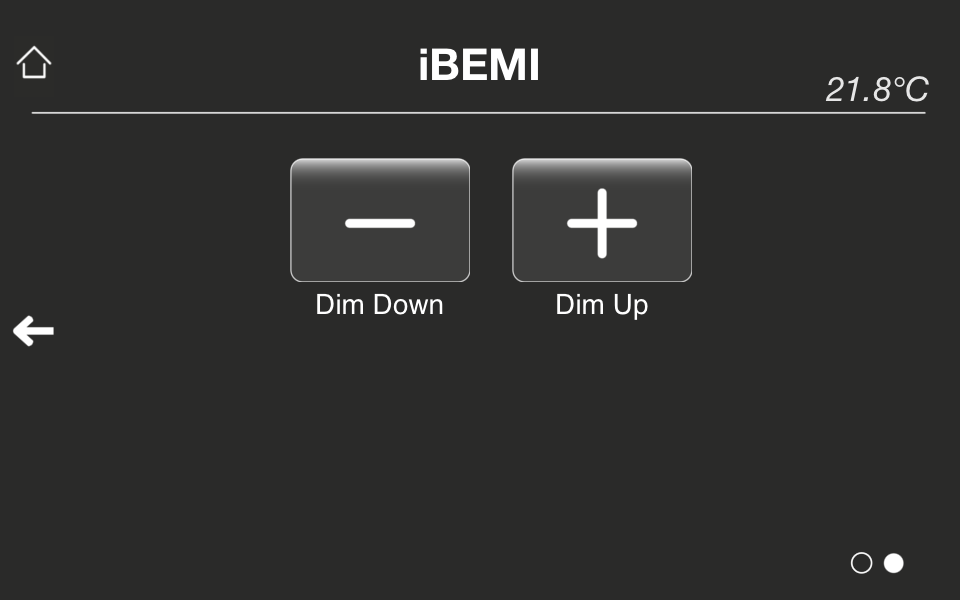
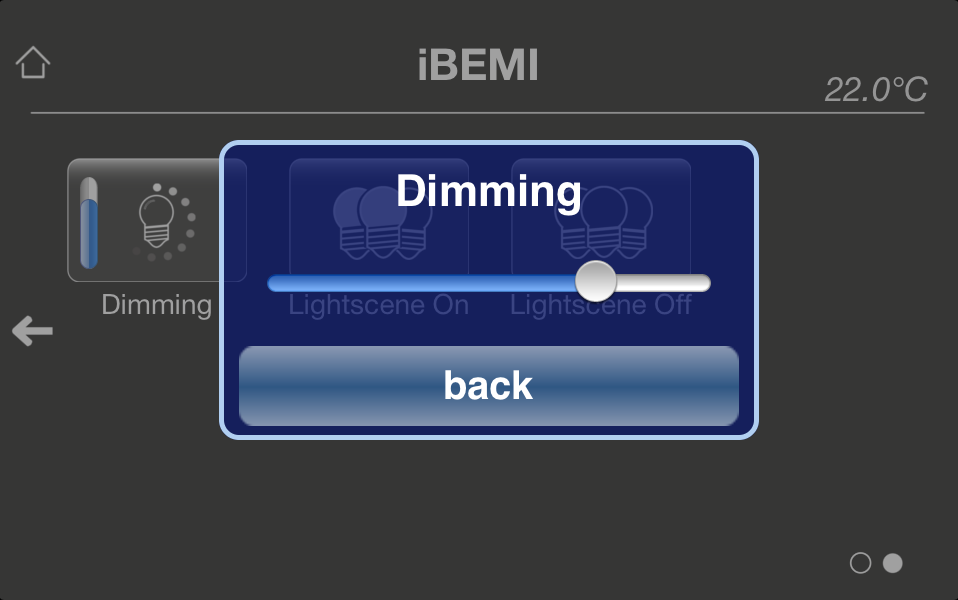
Buttons with function Dimming should be connected to a KNX dimming actuator. There is 4 bit and 1 byte Data Format available with this function. With 1 byte dimming there is a slider shown in a pop up window on button press to set the value directly. With 4 bit dimming option, a certain increment/decrement value is send to modify dimmer output.
 | You are able to add a Switch Object (1bit) to this function to switch dimming actuator ON and OFF. In this case, the selected dimming value is sent on long press of button - short press is assigned to switching action. The time interval before performing dimming action could be set at "Time between switching and dimming" under More Settings. You could show the current status (ON/OFF) of the connected actuator. The button is adapting state from KNX group address which is entered at entry KNX Address for status indication. This feedback address could be polled - if polling is chosen, KNX Address should be set as readable so that current state could be fetched by the app. You could set Telegram Repetition option to send multiple telegrams as long as button is pressed. At Telegram Repetition Time you could set time interval in between the telegrams. |
| Attributes | ||
| Name | Name that should be shown beneath button. | |
| Switch Object | You could choose if you'd like to have switching function with this button. | |
| KNX Address switch object | At this parameter you have to enter the KNX group address of switch object (1bit) of the dimming actuator. | |
| KNX Address dimming object | Here yo enter KNX group address of dimming object (4 bit) of the dimming actuator | |
| Command on button release | You can choose which action should be performed on button release. Available actions are Brighter, Darker and Brighter/Darker. | |
| Dimming brighter by Dimming darker by | You can select the step width to increment/decrement dimming value on each button press (- or per telegram with option Telegram Repetition set.) Available values are 100%, 50%, 25%, 12,5%, 6%, 3%, 1,5%. | |
| Telegram Repetition Time | Here you are able to add repetition function. You can choose time intervals starting from 100ms to 1s. | |
| KNX Address for status indication | Here at this parameter you enter KNX group address to indicate status (1bit) of the actuator. There is a checkbox to set whether this address should be polled or not. Note: If this KNX Address should be polled, the address should be marked as readable in your ETS project. | |
| Icon | Select icon that should be shown on button. | |
| More Settings | ||
| Icon for active state | Here you could select another icon that would only be shown if status of button is ON. You could also set another KNX address at the field below to control the icons. | |
| KNX Address for controlling the icons | Usually the icons of a button are set according to its status (that is the value at "KNX Address for status indication"). However, if you'd like to control icons independently from status, you could set a special KNX Address (1bit value) here to control the icons. There is a checkbox to set whether this address should be polled or not. Note: If this KNX Address should be polled, the address should be marked as readable in your ETS project. | |
| Time between switching and dimming | If you added a Switch Object to this button, you could set a custom time interval before performing dimming action here. You can choose time intervals starting from 10ms to 1s. Default interval is 300ms. | |
| PIN Secured | Check this option to avoid unauthorised access to this button. If the Secure PIN option is set, you need to enter a PIN before you could use the button. The PIN is set in Profile Settings and can also be easily changed later in iBEMI App Settings. |
 | You are able to add a Switch Object (1bit) to this function to switch dimming actuator ON and OFF. In this case, the popup window with the slider to set dimming value is prompted on long press of button - short press is assigned to switching action. The time interval before showing dimming control view could be set at "Time interval before showing control view" under More Settings. You could show the current status (ON/OFF) of the connected actuator. The button is adapting state from KNX group address which is entered at entry KNX Address for status indication. This feedback address could be polled - if polling is chosen, KNX Address should be set as readable so that current state could be fetched by the app. |
| Attributes | ||
| Name | Name that should be shown beneath button. | |
| Switch Object | You could choose if you'd like to have switching function with this button. | |
| KNX Address switch object | At this parameter you have to enter the KNX group address of switch object (1bit) of the dimming actuator. | |
| KNX Address value | Here yo enter KNX group address of value object (1 byte) of the dimming actuator | |
| KNX Feedback Address for value | You can enter KNX feedback address to fetch dimming value. The value at this address is stored for this button. If there is no feedback address available, you should enter address of "KNX Address value" here. There is a checkbox to set whether this address should be polled or not. Note: If this KNX Address should be polled, the address should be marked as readable in your ETS project. | |
| KNX Address for status indication | Here at this parameter you enter KNX group address to indicate status (1bit) of the actuator. There is a checkbox to set whether this address should be polled or not. Note: If this KNX Address should be polled, the address should be marked as readable in your ETS project. | |
| Icon | Select icon that should be shown on button. | |
| More Settings | ||
| Time interval before showing control view | If Switch Object is set, you could set a custom time interval before showing dimming control view here. You can choose time intervals starting from 10ms to 1s. Default interval is 300ms. | |
| PIN Secured | Check this option to avoid unauthorised access to this button. If the Secure PIN option is set, you need to enter a PIN before you could use the button. The PIN is set in Profile Settings and can also be easily changed later in iBEMI App Settings. |
Shutter Control
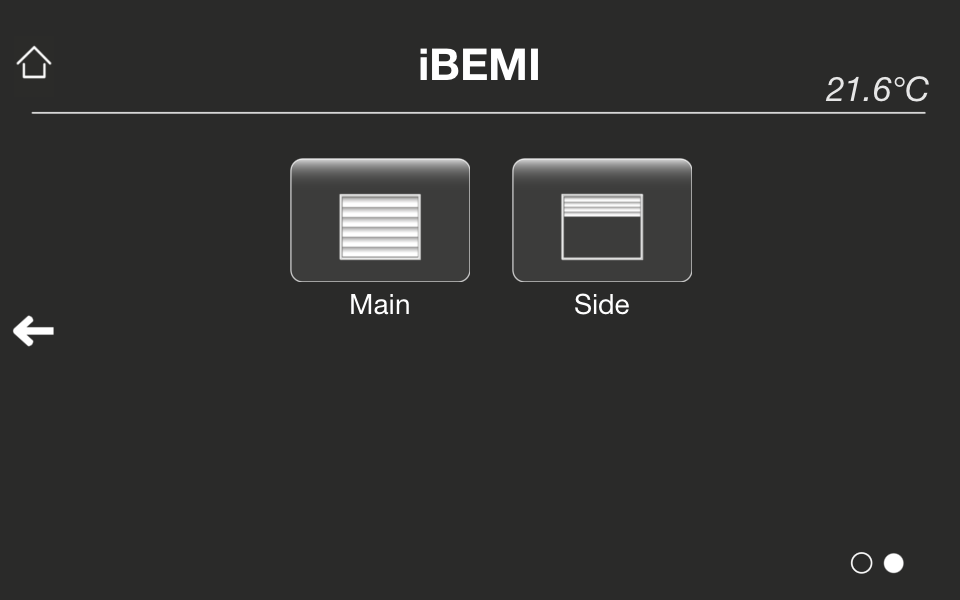 | Buttons of function Shutter Control should be connected to a KNX shutter actuators. You could choose either operation mode Move-Step or Step-Move-Step. The button could indicate the current status of the shutter actuator through the buttons border or through shutter icons. The button is adapting state from KNX group address which is entered at entry KNX Address for status indication (or KNX Address for controlling the icons - find more information below). This feedback addresses could be polled - if polling is chosen, KNX Address should be set as readable so that current state could be fetched by the app. |
| Attributes | ||
| Name | Name that should be shown beneath button. | |
| KNX Address step operation | At this parameter you have to enter the KNX group address for 1bit step operation. | |
| KNX Address move operation | KNX group address for 1bit move operation. | |
| Operation Mode | Here you are able to configure the Operation Mode of the button. You can choose either Move-Step or Step-Move-Step. Move-Step is used for controlling only the lamella. Defaultly Step-Move-Step is selected. | |
| Function | Available functions are Up,Down and Up/Down. Function Up is defaultly set. | |
| Time between step and move operation | Here you have to set the time that it takes to fully open->close the shutter. | |
| Lamella adjustment time | Here you set the time for open->close blinds. | |
| KNX Address for status indication | Here at this parameter you enter KNX group address to indicate status (1bit) of the shutter actuator. There is a checkbox to set whether this address should be polled or not. Note: If this KNX Address should be polled, the address should be marked as readable in your ETS project. | |
| Icon | Select icon that should be shown on button. | |
| More Settings | ||
| Icon for active state | Here you could select another icon that would only be shown if status of button is ON. You could also set another KNX address at the field below to control the icons. | |
| KNX Address for controlling the icons | Usually the icons of a button are set according to its status (that is the value at "KNX Address for status indication"). However, if you'd like to control icons independently from status, you could set a special KNX Address (1bit value) here to control the icons. There is a checkbox to set whether this address should be polled or not. Note: If this KNX Address should be polled, the address should be marked as readable in your ETS project. | |
| PIN Secured | Check this option to avoid unauthorised access to this button. If the Secure PIN option is set, you need to enter a PIN before you could use the button. The PIN is set in Profile Settings and can also be easily changed later in iBEMI App Settings. |
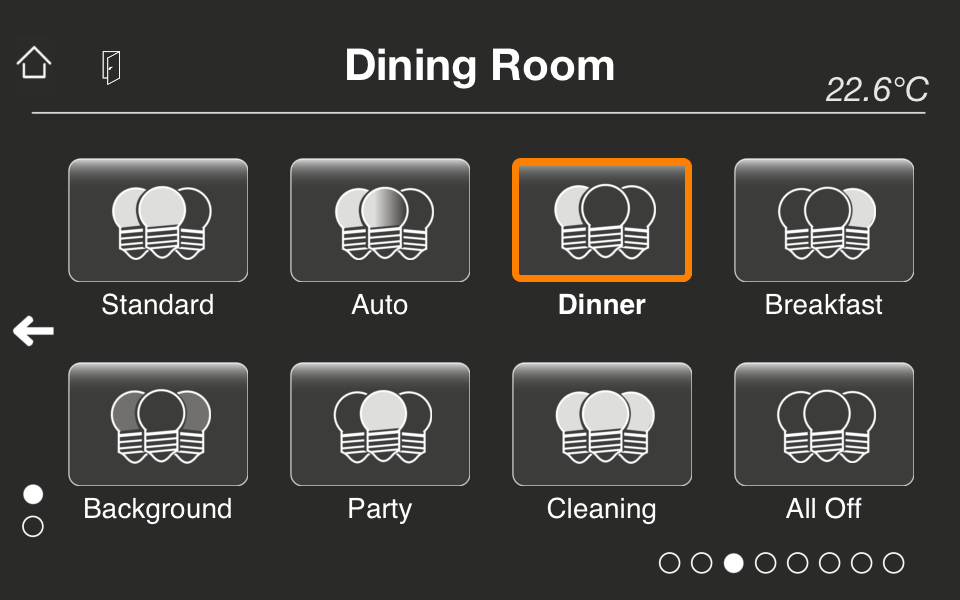
Lightscene
iBEMI is perfectly able to control the Lightscenes (DPT_SceneControl) of your KNX installation. To create a button for controlling a Lightscene you choose button function Value Transmitter and select Data Format Lightscene. If you'd like the buttons to indicate the current active scene, check option Status indication. If you configured the Lightscene as learnable in your KNX, you can check option Memory function. In this case a store scene command is sent when you press the button longer than 2 seconds.
See all the parameters below at button function Value Transmitter.
Value Transmitter
 | On button press buttons of function Value Transmitter are sending a certain value to a given KNX group address. There are several different Data Formats available for the sending value. The default Data Format is Lightscene. |
| Attributes | ||
| Name | Name that should be shown beneath button. | |
| KNX Address | KNX group address for the value. | |
| Data Format | Here you select the Data Format of the value. You can choose from Lightscene, Temperature, Brightness, Energy, Power, Text, 1 byte, 2 byte, 2 byte float, 4 byte, 4 byte signed and 4 byte float. Default data format is Lightscene. | |
| Memory Function | This function is only available with Data Format Lightscene. If you set this function, a popup window will appear on long press of button, asking if you'd like to store the Lightscene. Note: The Lightscene is not stored in the App. If Store is pressed in popup, the App is sending store-telegram to given KNX address. | |
| Value | The value that should be sent. | |
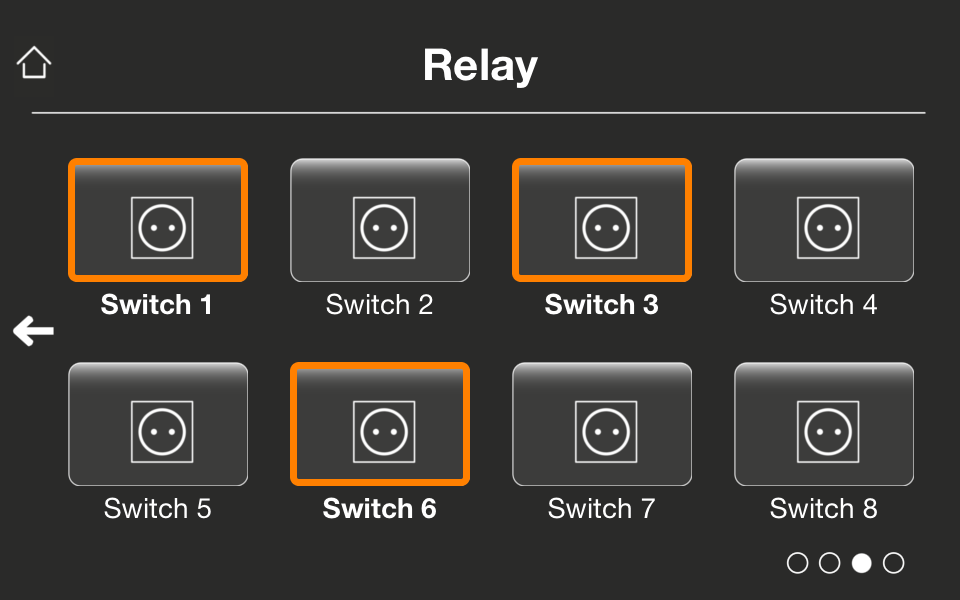
| Status indication | This parameter is only available with Data Format Lightscene. If you check this option, the active Lightscene button is highlighted (orange bordered). There is a checkbox to set whether KNX Address should be polled or not. Note: If KNX Address should be polled, the address should be marked as readable in your ETS project. | |
| Icon | Select icon that should be shown on button. | |
| More Settings | ||
| PIN Secured | Check this option to avoid unauthorised access to this button. If the Secure PIN option is set, you need to enter a PIN before you could use the button. The PIN is set in Profile Settings and can also be easily changed later in iBEMI App Settings. |
HVAC Mode
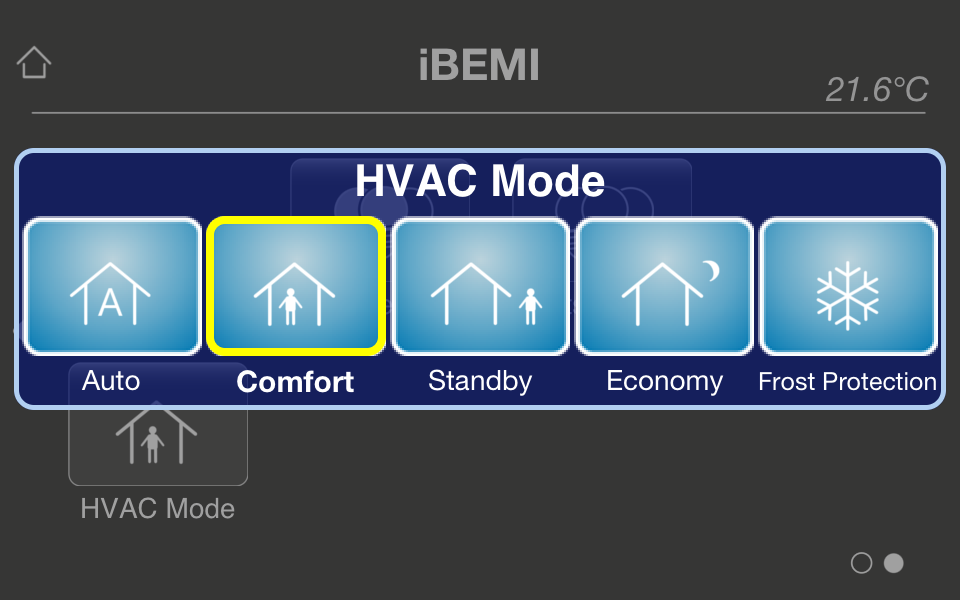 | On button press a control window is opened that shows buttons to control your heating system through KNX Datapoint Type HVAC Mode (DPT_HVACMode). You can choose if you would like to have five or four control buttons. In four button mode the Auto button is missing. The current status of your heating is indicated through the icon on the button surface. |
| Attributes | ||
| Name | Name that should be shown beneath button. | |
| Mode | You can choose between five button and four button mode. The difference is that in four button mode the Auto button is missing in the control window. | |
| KNX Address | KNX group address for setting the value (1byte - DPT_HVACMode). | |
| KNX Feedback Address | Feedback KNX group address for the value. The value at this address is used to set the status of this button. If there is no feedback address available, you should enter above address of "KNX Address" here. There is a checkbox to set whether this address should be polled or not. Note: If this KNX Address should be polled, the address should be marked as readable in your ETS project. | |
| More Settings | ||
| PIN Secured | Check this option to avoid unauthorised access to this button. If the Secure PIN option is set, you need to enter a PIN before you could use the button. The PIN is set in Profile Settings and can also be easily changed later in iBEMI App Settings. |
Temperature
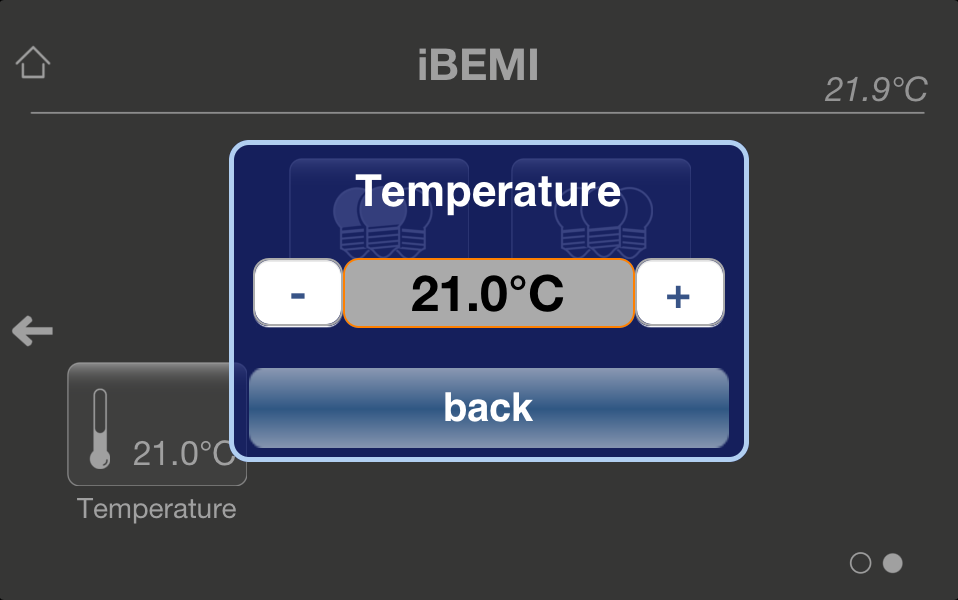 | Button with function Temperature should be used in ventilation tasks. On button press a popup window is shown where you could control (increase/decrease) a temperature value. |
| Attributes | ||
| Name | Name that should be shown beneath button. | |
| KNX Address value | KNX group address for temperature set value (DPT_Value_Temp). Address is also read to get feedback from KNX. There is a checkbox to set if these addresses should be polled or not. Note: If this KNX Address should be polled, the address should be marked as readable in your ETS project. | |
| KNX Feedback Address for value shown on button | The value at this address is stored in the button and shown on button surface. There is a checkbox to set if these addresses should be polled or not. Note: If this KNX Address should be polled, the address should be marked as readable in your ETS project. | |
| Icon | Select icon that should be shown on button. | |
| More Settings | ||
| Decimal places | At this parameter you could select the number of decimals that should be printed with the temperature value. Defaultly one decimal is shown. | |
| Unit | You could set a custom unit for the value here. "°C" is default unit. | |
| PIN Secured | Check this option to avoid unauthorised access to this button. If the Secure PIN option is set, you need to enter a PIN before you could use the button. The PIN is set in Profile Settings and can also be easily changed later in iBEMI App Settings. |
RGB
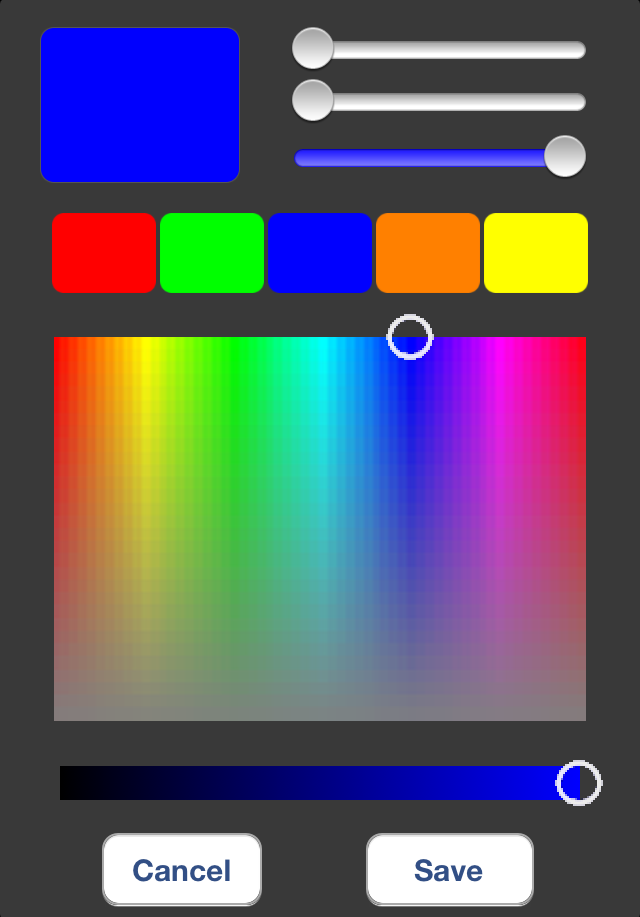 | This button function is used to work with RGB controllers. On button press a window is shown where you could pick a color and store favorite colors. There are two different Data Formats for transmitting the color value over KNX: "1 byte Components" and "3 byte Color". With "1 byte Components", the three 1 byte color components are transmitted in three separate telegrams - with "3 byte Color" all components are transmitted in one telegram. The latter Data Format should be preferred if available. You are able to add a Switch Object (1bit) to this function. In this case, the popup window with the slider to set color is prompted on long press of button - short press is assigned to switching action. The time interval before showing RGB control view could be set at "Time interval before showing control view" under More Settings. You could show the current status (ON/OFF) of the connected actuator. The button is adapting state from KNX group address which is entered at entry KNX Address for status indication. This feedback address could be polled - if polling is chosen, KNX Address should be set as readable so that current state could be fetched by the app. |
| Attributes | ||
| Name | Name that should be shown beneath button. | |
| Switch Object | You could choose if you'd like to have switching function with this button. | |
| KNX Address switch object | At this parameter you have to enter the KNX group address of switch object (1bit) of RGB controller. | |
| KNX Address for red color | KNX group address for red color component (1byte). | |
| KNX Address for green color | KNX group address for green color component (1byte). | |
| KNX Address for blue color | KNX group address for blue color component (1byte). | |
| KNX Feedback Address for red color | Here you should enter feedback address for red color component (1byte). The value at this address is stored in button. If there is no separate feedback address available, you should also enter set address for component here. | |
| KNX Feedback Address for green color | Here you should enter feedback address for green color component (1byte). The value at this address is stored in button. If there is no separate feedback address available, you should also enter set address for component here. | |
| KNX Feedback Address for blue color | Here you should enter feedback address for blue color component (1byte). The value at this address is stored in button. If there is no separate feedback address available, you should also enter set address for component here. | |
| KNX Address for status indication | You are able to enter KNX group address to indicate status (1bit). There is a checkbox to set if this address and the other three feeback addresses for the color components should be polled or not. Note: If KNX Addresses should be polled, the addresses should be marked as readable in your ETS project. | |
| Icon | Select icon that should shown on button. | |
| More Settings | ||
| Time interval before showing control view | If Switch Object is set, you could set a custom time interval before showing dimming control view here. You can choose time intervals starting from 10ms to 1s. Default interval is 300ms. | |
| PIN Secured | Check this option to avoid unauthorised access to this button. If the Secure PIN option is set, you need to enter a PIN before you could use the button. The PIN is set in Profile Settings and can also be easily changed later in iBEMI App Settings. |
| Attributes | ||
| Name | Name that should be shown beneath button. | |
| Switch Object | You could choose if you'd like to have switching function with this button. | |
| KNX Address switch object | At this parameter you have to enter the KNX group address of switch object (1bit) of RGB controller. | |
| KNX Address for color value | KNX group address for RGB color (3byte). | |
| KNX Feedback Address for color value | Here you should enter feedback address for RGB color (1byte). The value at this address is stored in button. If there is no separate feedback address available, you should also enter set address for color value here. | |
| KNX Address for status indication | You are able to enter KNX group address to indicate status (1bit). There is a checkbox to set if this address and the feeback address for the color value should be polled or not. Note: If KNX Addresses should be polled, the addresses should be marked as readable in your ETS project. | |
| Icon | Select icon that should shown on button. | |
| More Settings | ||
| Time interval before showing control view | If Switch Object is set, you could set a custom time interval before showing dimming control view here. You can choose time intervals starting from 10ms to 1s. Default interval is 300ms. | |
| PIN Secured | Check this option to avoid unauthorised access to this button. If the Secure PIN option is set, you need to enter a PIN before you could use the button. The PIN is set in Profile Settings and can also be easily changed later in iBEMI App Settings. |
Time Control
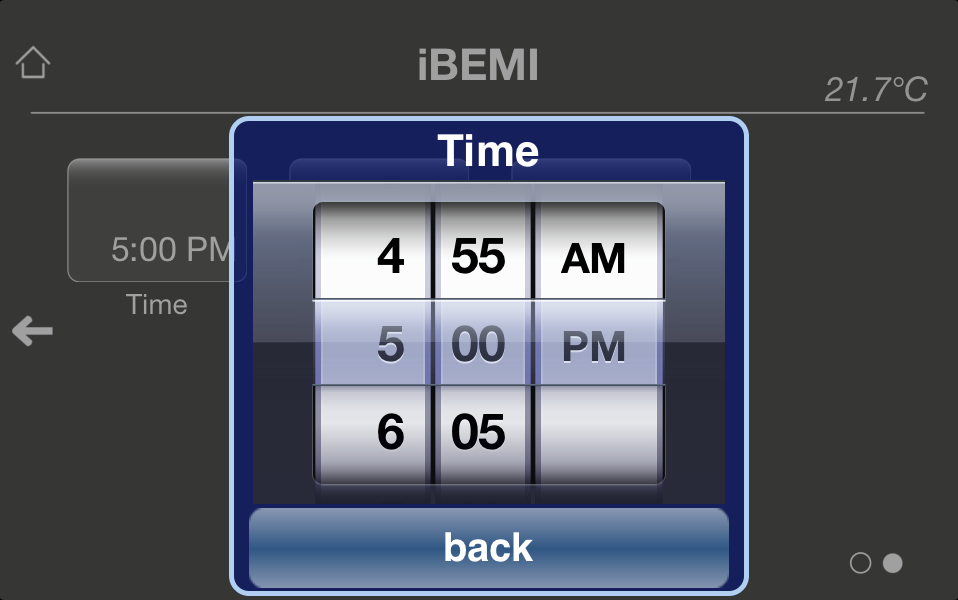 | This button function is used to send a time value (DPT_TimeOfDay). On button press a window is shown where you could pick a time. The time is sent directly after picking it. You are able to add a Switch Object (1bit) to this function. In this case, the time picker popup window is prompted on long press of button - short press is assigned to switching action. The time interval before showing time control view could be set at "Time interval before showing control view" under More Settings. You could show the current status (ON/OFF) of the connected actuator. The button is adapting state from KNX group address which is entered at entry KNX Address for status indication. This feedback address could be polled - if polling is chosen, KNX Address should be set as readable so that current state could be fetched by the app. |
| Attributes | ||
| Name | Name that should be shown beneath button. | |
| Switch Object | You could choose if you'd like to have switching function with this button. | |
| KNX Address switch object | At this parameter you have to enter the KNX group address of switch object (1bit) for this button. | |
| KNX Address value | KNX group address to set time value (DPT_TimeOfDay). | |
| KNX Feedback Address for value | You can enter KNX feedback address to fetch time value. The value at this address is stored for this button. If there is no feedback address available, you should enter address of "KNX Address value" here. There is a checkbox to set whether this address should be polled or not. Note: If this KNX Address should be polled, the address should be marked as readable in your ETS project. | |
| KNX Address for status indication | You are able to enter KNX group address to indicate status (1bit) of the switching actuator. There is a checkbox to set whether this address should be polled or not. Note: If KNX Address should be polled, the address should be marked as readable in your ETS project. | |
| More Settings | ||
| Day that should be added to time value | Here you could set the day which should be added to time value. Defaultly "No day" is set. | |
| Minute interval in control | You are able to set a custom minute interval in time picker control. Available intervals are 1min, 2min, 5min and 10min. Default value is 5min. | |
| Time Format on button | You could select a custom format for the time which is printed on button surface. There are several different formats available. Default format is HH:mm. | |
| Time interval before showing control view | If Switch Object is set, you could set a custom time interval before showing dimming control view here. You can choose time intervals starting from 10ms to 1s. Default interval is 300ms. | |
| PIN Secured | Check this option to avoid unauthorised access to this button. If the Secure PIN option is set, you need to enter a PIN before you could use the button. The PIN is set in Profile Settings and can also be easily changed later in iBEMI App Settings. |
Date Control
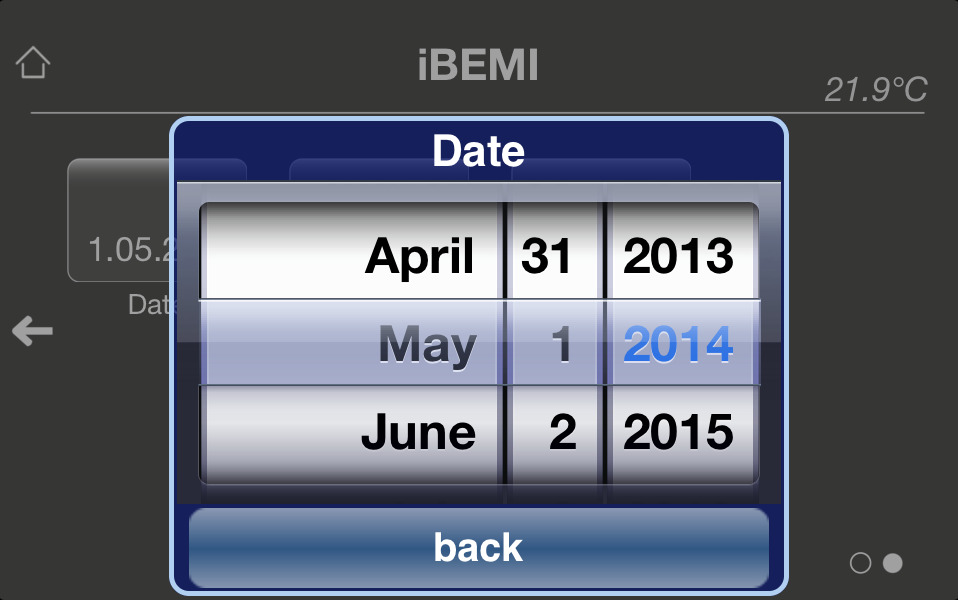 | This button function is used to send a date value (DPT_Date). On button press a window is shown where you could pick a date. The date is sent directly after picking it. |
| Attributes | ||
| Name | Name that should be shown beneath button. | |
| KNX Address value | KNX group address to set date value (DPT_Date). | |
| KNX Feedback Address for value | You can enter KNX feedback address to fetch date value. The value at this address is stored for this button. If there is no feedback address available, you should enter address of "KNX Address value" here. There is a checkbox to set whether this address should be polled or not. Note: If this KNX Address should be polled, the address should be marked as readable in your ETS project. | |
| More Settings | ||
| Date Format on button | You could select a custom format for the date which is printed on button surface. There are several different formats available. Default format is d.MM.yyyy. | |
| PIN Secured | Check this option to avoid unauthorised access to this button. If the Secure PIN option is set, you need to enter a PIN before you could use the button. The PIN is set in Profile Settings and can also be easily changed later in iBEMI App Settings. |
Indication
 | With this button function a value at a KNX Address is shown on the button - or, with Data Format "1 bit Status", the status is indicated through the border of the button. There are several different Data Formats available with this function. |
| Attributes | ||
| Name | Name that should be shown beneath button. | |
| KNX Address | At this parameter you have to enter the KNX group address of the desired value. There is a checkbox to set whether this address should be polled or not. Note: If this KNX Address should be polled, the address should be marked as readable in your ETS project. | |
| Data Format | At this drop down menu you are able to choose the Data Format of the desired value. 1 bit Status, Temperature, Brightness, Windspeed, Energy, Power, Time, Date, Text, 1 byte, 2 byte, 2 byte float, 4 byte, 4 byte signed and 4 byte float are the available Data Formats. | |
| Icon | Select icon that should shown on button. | |
| More Settings | ||
| Icon for active state | For Data Format 1 bit Status you could select another icon that would only be shown if status of button is ON. You could also set another KNX address at the field below to control the icons. | |
| KNX Address for controlling the icons | Usually the icons of a button are set according to its status. However, if you'd like to control icons independently from status, you could set a special KNX Address (1bit value) here to control the icons. There is a checkbox to set whether this address should be polled or not. Note: If this KNX Address should be polled, the address should be marked as readable in your ETS project. | |
| KNX Address for activating second status | For Data Format 1 bit Status you could indicate a second status which is controlled through this KNX address. Second status is indicated through a thick red border line around the button (if status is active). Second status has higher priority than common status, meaning if both status are active, red border color is shown around the button. There is a checkbox to set whether this address should be polled or not. Note: If this KNX Address should be polled, the address should be marked as readable in your ETS project. | |
| Unit | You could set a Unit which is shown with the value in the app for all Data Formats except Time and Date. There are default Units for Data Formats Temperature [°C], Brightness [Lux], Windspeed [m/s], Energy [kWh] and Power [W]. | |
| Scaling factor | If Data Format is 2 byte float or 4 byte float, you could set a custom scaling factor for the value at this parameter. This is of optional. The default value is 0.01 for Data Format 2 byte float and 1 for Data Format 4 byte float. | |
| Decimal places | For Data Formats Temperature, Windspeed, Power, 2 byte float and 4 byte float you could set the number of decimal places of the value that should be displayed in the value label. Defaultly there is one decimal place shown with the respective Data Formats. | |
| Time Format | You could select a custom format for the shown time. The default format is E HH:mm. | |
| Date Format | You could select a custom format for the shown date. The default format is d.MM.yyyy. |
Room Link
 | Room Link buttons are placed on the level page - every room link button is representanting a room in the level. If you press this button in the app you are navigated to the corresponding room. If you select a Room Link button in the iBEMI Profile Editor, you could set the name of the room and you are able to select an icon for the room link button. Under More Settings you also find an option called PIN Secured: If you set this option the content of the corresponding room would not be shown in the iBEMI app - you have to enter the PIN first. The PIN is set in Profile Settings but it can also be easily changed in the iBEMI Settings later. Room Link buttons can't be moved directly on level page, you could move the room page in treeview to do so though. |
Supported KNX Datapoint Types
| KNX Specifications | In Profile Editor | ||
| DPT_ID | DPT_Name | Data Format | Function |
| 1.001 | DPT_Switch | 1 bit Status | Button: Switching and Indication |
| 1.002 | DPT_Bool | 1 bit Status | Button: Switching and Indication |
| 1.003 | DPT_Enable | 1 bit Status | Button: Switching and Indication |
| 1.004 | DPT_Ramp | 1 bit Status | Button: Switching and Indication |
| 1.005 | DPT_Alarm | 1 bit Status | Button: Switching and Indication |
| 1.006 | DPT_BinaryValue | 1 bit Status | Button: Switching and Indication |
| 1.007 | DPT_Step | 1 bit Status | Button: Switching, Shutter Control and Indication |
| 1.008 | DPT_UpDown | 1 bit Status | Button: Switching, Shutter Control and Indication |
| 1.009 | DPT_OpenClose | 1 bit Status | Button: Switching and Indication |
| 1.010 | DPT_Start | 1 bit Status | Button: Switching and Indication |
| 1.011 | DPT_State | 1 bit Status | Button: Switching and Indication |
| 1.012 | DPT_Invert | 1 bit Status | Button: Switching and Indication |
| 1.013 | DPT_DimSendStyle | 1 bit Status | Button: Switching and Indication |
| 1.014 | DPT_InputSource | 1 bit Status | Button: Switching and Indication |
| 1.015 | DPT_Reset | 1 bit Status | Button: Switching and Indication |
| 1.016 | DPT_Ack | 1 bit Status | Button: Switching and Indication |
| 1.017 | DPT_Trigger | 1 bit Status | Button: Switching and Indication |
| 1.018 | DPT_Occupancy | 1 bit Status | Button: Switching and Indication |
| 1.019 | DPT_Window_Door | 1 bit Status | Button: Switching and Indication |
| 1.021 | DPT_LogicalFunction | 1 bit Status | Button: Switching and Indication |
| 1.022 | DPT_Scene_AB | 1 bit Status | Button: Switching and Indication |
| 1.023 | DPT_ShutterBlinds_Mode | 1 bit Status | Button: Switching and Indication |
| 1.100 | DPT_Heat/Cool | 1 bit Status | Button: Switching and Indication |
| 3.007 | DPT_Control_Dimming | 4 bit | Button: Dimming |
| 3.008 | DPT_Control_Blinds | 4 bit | Button: Dimming |
| 5.001 | DPT_Scaling | 1 byte | Button: Dimming, Value Transmitter and Indication & Value Label |
| 5.003 | DPT_Angle | 1 byte | Button: Dimming, Value Transmitter and Indication & Value Label |
| 5.004 | DPT_Percent_U8 | 1 byte | Button: Dimming, Value Transmitter and Indication & Value Label |
| 5.005 | DPT_DecimalFactor | 1 byte | Button: Dimming, Value Transmitter and Indication & Value Label |
| 5.006 | DPT_Tariff | 1 byte | Button: Dimming, Value Transmitter and Indication & Value Label |
| 5.010 | DPT_Value_1_Ucount | 1 byte | Button: Dimming, Value Transmitter and Indication & Value Label |
| 7.001 | DPT_Value_2_Ucount | 2 byte | Button: Value Transmitter and Indication & Value Label |
| 7.002 | DPT_TimePeriodMsec | 2 byte | Button: Value Transmitter and Indication & Value Label |
| 7.003 | DPT_TimePeriod10MSec | 2 byte | Button: Value Transmitter and Indication & Value Label |
| 7.004 | DPT_TimePeriod100MSec | 2 byte | Button: Value Transmitter and Indication & Value Label |
| 7.005 | DPT_TimePeriodSec | 2 byte | Button: Value Transmitter and Indication & Value Label |
| 7.006 | DPT_TimePeriodMin | 2 byte | Button: Value Transmitter and Indication & Value Label |
| 7.007 | DPT_TimePeriodHrs | 2 byte | Button: Value Transmitter and Indication & Value Label |
| 7.010 | DPT_PropDataType | 2 byte | Button: Value Transmitter and Indication & Value Label |
| 7.011 | DPT_Length_mm | 2 byte | Button: Value Transmitter and Indication & Value Label |
| 7.012 | DPT_UElCurrentmA | 2 byte | Button: Value Transmitter and Indication & Value Label |
| 7.013 | DPT_Brightness | 2 byte | Button: Value Transmitter and Indication & Value Label |
| 9.001 | DPT_Value_Temp | Temperature | Button: Temperature, Value Transmitter and Indication & Value Label |
| 9.002 | DPT_Value_Tempd | 2 byte float | Button: Value Transmitter and Indication & Value Label |
| 9.003 | DPT_Value_Tempa | 2 byte float | Button: Value Transmitter and Indication & Value Label |
| 9.004 | DPT_Value_Lux | Brightness | Button: Value Transmitter and Indication & Value Label |
| 9.005 | DPT_Value_Wsp | Windspeed | Button: Value Transmitter and Indication & Value Label |
| 9.006 | DPT_Value_Pres | 2 byte float | Button: Value Transmitter and Indication & Value Label |
| 9.007 | DPT_Value_Humidity | 2 byte float | Button: Value Transmitter and Indication & Value Label |
| 9.008 | DPT_Value_AirQuality | 2 byte float | Button: Value Transmitter and Indication & Value Label |
| 9.010 | DPT_Value_Time1 | 2 byte float | Button: Value Transmitter and Indication & Value Label |
| 9.011 | DPT_Value_Time2 | 2 byte float | Button: Value Transmitter and Indication & Value Label |
| 9.020 | DPT_Value_Volt | 2 byte float | Button: Value Transmitter and Indication & Value Label |
| 9.021 | DPT_Value_Curr | 2 byte float | Button: Value Transmitter and Indication & Value Label |
| 9.022 | DPT_PowerDensity | 2 byte float | Button: Value Transmitter and Indication & Value Label |
| 9.023 | DPT_KelvinPerPercent | 2 byte float | Button: Value Transmitter and Indication & Value Label |
| 9.024 | DPT_Power | 2 byte float | Button: Value Transmitter and Indication & Value Label |
| 9.025 | DPT_Value_Volume_Flow | 2 byte float | Button: Value Transmitter and Indication & Value Label |
| 9.026 | DPT_Rain_Amount | 2 byte float | Button: Value Transmitter and Indication & Value Label |
| 9.027 | DPT_Value_Temp_F | 2 byte float | Button: Value Transmitter and Indication & Value Label |
| 9.028 | DPT_Value_Wsp_kmh | Windspeed | Button: Value Transmitter and Indication & Value Label |
| 10.001 | DPT_TimeOfDay | Time | Button: Time Control and Indication & Value Label |
| 11.001 | DPT_Date | Date | Button: Date Control and Indication & Value Label |
| 12.001 | DPT_Value_4_Ucount | 4 byte | Button: Value Transmitter and Indication & Value Label |
| 13.001 | DPT_Value_4_Count | 4 byte signed | Button: Value Transmitter and Indication & Value Label |
| 13.010 | DPT_ActiveEnergy | Energy | Button: Value Transmitter and Indication & Value Label |
| 13.011 | DPT_ApparantEnergy | Energy | Button: Value Transmitter and Indication & Value Label |
| 13.012 | DPT_ReactiveEnergy | Energy | Button: Value Transmitter and Indication & Value Label |
| 13.013 | DPT_ActiveEnergy_kWh | Energy | Button: Value Transmitter and Indication & Value Label |
| 13.014 | DPT_ApparantEnergy_kVAh | Energy | Button: Value Transmitter and Indication & Value Label |
| 13.015 | DPT_ReactiveEnergy_kVARh | Energy | Button: Value Transmitter and Indication & Value Label |
| 13.100 | DPT_LongDeltaTimeSec | 4 byte signed | Button: Value Transmitter and Indication & Value Label |
| 14.000 | DPT_Value_Acceleration | 4 byte float | Button: Value Transmitter and Indication & Value Label |
| 14.001 | DPT_Value_Acceleration_Angular | 4 byte float | Button: Value Transmitter and Indication & Value Label |
| 14.002 | DPT_Value_Activation_Energy | 4 byte float | Button: Value Transmitter and Indication & Value Label |
| 14.003 | DPT_Value_Activity | 4 byte float | Button: Value Transmitter and Indication & Value Label |
| 14.004 | DPT_Value_Mol | 4 byte float | Button: Value Transmitter and Indication & Value Label |
| 14.005 | DPT_Value_Amplitude | 4 byte float | Button: Value Transmitter and Indication & Value Label |
| 14.006 | DPT_Value_AngleRad | 4 byte float | Button: Value Transmitter and Indication & Value Label |
| 14.007 | DPT_Value_AngleDeg | 4 byte float | Button: Value Transmitter and Indication & Value Label |
| 14.008 | DPT_Value_Angular_Momentum | 4 byte float | Button: Value Transmitter and Indication & Value Label |
| 14.009 | DPT_Value_Angular_Velocity | 4 byte float | Button: Value Transmitter and Indication & Value Label |
| 14.010 | DPT_Value_Area | 4 byte float | Button: Value Transmitter and Indication & Value Label |
| 14.011 | DPT_Value_Capacitance | 4 byte float | Button: Value Transmitter and Indication & Value Label |
| 14.012 | DPT_Value_Charge_DensitySurface | 4 byte float | Button: Value Transmitter and Indication & Value Label |
| 14.013 | DPT_Value_Charge_DensityVolume | 4 byte float | Button: Value Transmitter and Indication & Value Label |
| 14.014 | DPT_Value_Compressibility | 4 byte float | Button: Value Transmitter and Indication & Value Label |
| 14.015 | DPT_Value_Conductance | 4 byte float | Button: Value Transmitter and Indication & Value Label |
| 14.016 | DPT_Value_Electrical_Conductivity | 4 byte float | Button: Value Transmitter and Indication & Value Label |
| 14.017 | DPT_Value_Density | 4 byte float | Button: Value Transmitter and Indication & Value Label |
| 14.018 | DPT_Value_Electric_Charge | 4 byte float | Button: Value Transmitter and Indication & Value Label |
| 14.019 | DPT_Value_Electric_Current | 4 byte float | Button: Value Transmitter and Indication & Value Label |
| 14.020 | DPT_Value_Electric_CurrentDensity | 4 byte float | Button: Value Transmitter and Indication & Value Label |
| 14.021 | DPT_Value_Electric_DipoleMoment | 4 byte float | Button: Value Transmitter and Indication & Value Label |
| 14.022 | DPT_Value_Electric_Displacement | 4 byte float | Button: Value Transmitter and Indication & Value Label |
| 14.023 | DPT_Value_Electric_FieldStrength | 4 byte float | Button: Value Transmitter and Indication & Value Label |
| 14.024 | DPT_Value_Electric_Flux | 4 byte float | Button: Value Transmitter and Indication & Value Label |
| 14.025 | DPT_Value_Electric_FluxDensity | 4 byte float | Button: Value Transmitter and Indication & Value Label |
| 14.026 | DPT_Value_Electric_Polarization | 4 byte float | Button: Value Transmitter and Indication & Value Label |
| 14.027 | DPT_Value_Electric_Potential | 4 byte float | Button: Value Transmitter and Indication & Value Label |
| 14.028 | DPT_Value_Electric_PotentialDifference | 4 byte float | Button: Value Transmitter and Indication & Value Label |
| 14.029 | DPT_Value_ElectromagneticMoment | 4 byte float | Button: Value Transmitter and Indication & Value Label |
| 14.030 | DPT_Value_Electromotive_Force | 4 byte float | Button: Value Transmitter and Indication & Value Label |
| 14.031 | DPT_Value_Energy | 4 byte float | Button: Value Transmitter and Indication & Value Label |
| 14.032 | DPT_Value_Force | 4 byte float | Button: Value Transmitter and Indication & Value Label |
| 14.033 | DPT_Value_Frequency | 4 byte float | Button: Value Transmitter and Indication & Value Label |
| 14.034 | DPT_Value_Angular_Frequency | 4 byte float | Button: Value Transmitter and Indication & Value Label |
| 14.035 | DPT_Value_Heat_Capacity | 4 byte float | Button: Value Transmitter and Indication & Value Label |
| 14.036 | DPT_Value_Heat_FlowRate | 4 byte float | Button: Value Transmitter and Indication & Value Label |
| 14.037 | DPT_Value_Heat_Quantity | 4 byte float | Button: Value Transmitter and Indication & Value Label |
| 14.038 | DPT_Value_Impedance | 4 byte float | Button: Value Transmitter and Indication & Value Label |
| 14.039 | DPT_Value_Length | 4 byte float | Button: Value Transmitter and Indication & Value Label |
| 14.040 | DPT_Value_Light_Quantity | 4 byte float | Button: Value Transmitter and Indication & Value Label |
| 14.041 | DPT_Value_Luminance | 4 byte float | Button: Value Transmitter and Indication & Value Label |
| 14.042 | DPT_Value_Luminous_Flux | 4 byte float | Button: Value Transmitter and Indication & Value Label |
| 14.043 | DPT_Value_Luminous_Intensity | 4 byte float | Button: Value Transmitter and Indication & Value Label |
| 14.044 | DPT_Value_Magnetic_FieldStrength | 4 byte float | Button: Value Transmitter and Indication & Value Label |
| 14.045 | DPT_Value_Magnetic_Flux | 4 byte float | Button: Value Transmitter and Indication & Value Label |
| 14.046 | DPT_Value_Magnetic_FluxDensity | 4 byte float | Button: Value Transmitter and Indication & Value Label |
| 14.047 | DPT_Value_Magnetic_Moment | 4 byte float | Button: Value Transmitter and Indication & Value Label |
| 14.048 | DPT_Value_Magnetic_Polarization | 4 byte float | Button: Value Transmitter and Indication & Value Label |
| 14.049 | DPT_Value_Magnetization | 4 byte float | Button: Value Transmitter and Indication & Value Label |
| 14.050 | DPT_Value_MagnetomotiveForce | 4 byte float | Button: Value Transmitter and Indication & Value Label |
| 14.051 | DPT_Value_Mass | 4 byte float | Button: Value Transmitter and Indication & Value Label |
| 14.052 | DPT_Value_MassFlux | 4 byte float | Button: Value Transmitter and Indication & Value Label |
| 14.053 | DPT_Value_Momentum | 4 byte float | Button: Value Transmitter and Indication & Value Label |
| 14.054 | DPT_Value_Phase_AngleRad | 4 byte float | Button: Value Transmitter and Indication & Value Label |
| 14.055 | DPT_Value_Phase_AngleDeg | 4 byte float | Button: Value Transmitter and Indication & Value Label |
| 14.056 | DPT_Value_Power | Power | Button: Value Transmitter and Indication & Value Label |
| 14.057 | DPT_Value_Power_Factor | 4 byte float | Button: Value Transmitter and Indication & Value Label |
| 14.058 | DPT_Value_Pressure | 4 byte float | Button: Value Transmitter and Indication & Value Label |
| 14.059 | DPT_Value_Reactance | 4 byte float | Button: Value Transmitter and Indication & Value Label |
| 14.060 | DPT_Value_Resistance | 4 byte float | Button: Value Transmitter and Indication & Value Label |
| 14.061 | DPT_Value_Resistivity | 4 byte float | Button: Value Transmitter and Indication & Value Label |
| 14.062 | DPT_Value_SelfInductance | 4 byte float | Button: Value Transmitter and Indication & Value Label |
| 14.063 | DPT_Value_SolidAngle | 4 byte float | Button: Value Transmitter and Indication & Value Label |
| 14.064 | DPT_Value_Sound_Intensity | 4 byte float | Button: Value Transmitter and Indication & Value Label |
| 14.065 | DPT_Value_Speed | 4 byte float | Button: Value Transmitter and Indication & Value Label |
| 14.066 | DPT_Value_Stress | 4 byte float | Button: Value Transmitter and Indication & Value Label |
| 14.067 | DPT_Value_Surface_Tension | 4 byte float | Button: Value Transmitter and Indication & Value Label |
| 14.068 | DPT_Value_Common_Temperature | 4 byte float | Button: Value Transmitter and Indication & Value Label |
| 14.069 | DPT_Value_Absolute_Temperature | 4 byte float | Button: Value Transmitter and Indication & Value Label |
| 14.070 | DPT_Value_TemperatureDifference | 4 byte float | Button: Value Transmitter and Indication & Value Label |
| 14.071 | DPT_Value_Thermal_Capacity | 4 byte float | Button: Value Transmitter and Indication & Value Label |
| 14.072 | DPT_Value_Thermal_Conductivity | 4 byte float | Button: Value Transmitter and Indication & Value Label |
| 14.073 | DPT_Value_ThermoelectricPower | 4 byte float | Button: Value Transmitter and Indication & Value Label |
| 14.074 | DPT_Value_Time | 4 byte float | Button: Value Transmitter and Indication & Value Label |
| 14.075 | DPT_Value_Torque | 4 byte float | Button: Value Transmitter and Indication & Value Label |
| 14.076 | DPT_Value_Volume | 4 byte float | Button: Value Transmitter and Indication & Value Label |
| 14.077 | DPT_Value_Volume_Flux | 4 byte float | Button: Value Transmitter and Indication & Value Label |
| 14.078 | DPT_Value_Weight | 4 byte float | Button: Value Transmitter and Indication & Value Label |
| 14.079 | DPT_Value_Work | 4 byte float | Button: Value Transmitter and Indication & Value Label |
| 16.000 | DPT_String_ASCII | Text | Button: Value Transmitter and Indication & Value Label |
| 16.001 | DPT_String_8859_1 | Text | Button: Value Transmitter and Indication & Value Label |
| 17.001 | DPT_SceneNumber | Lightscene | Button: Value Transmitter |
| 18.001 | DPT_SceneControl | Lightscene | Button: Value Transmitter |
| 20.102 | DPT_HVACMode | Button: HVAC Mode | |
iBEMI Styles
|
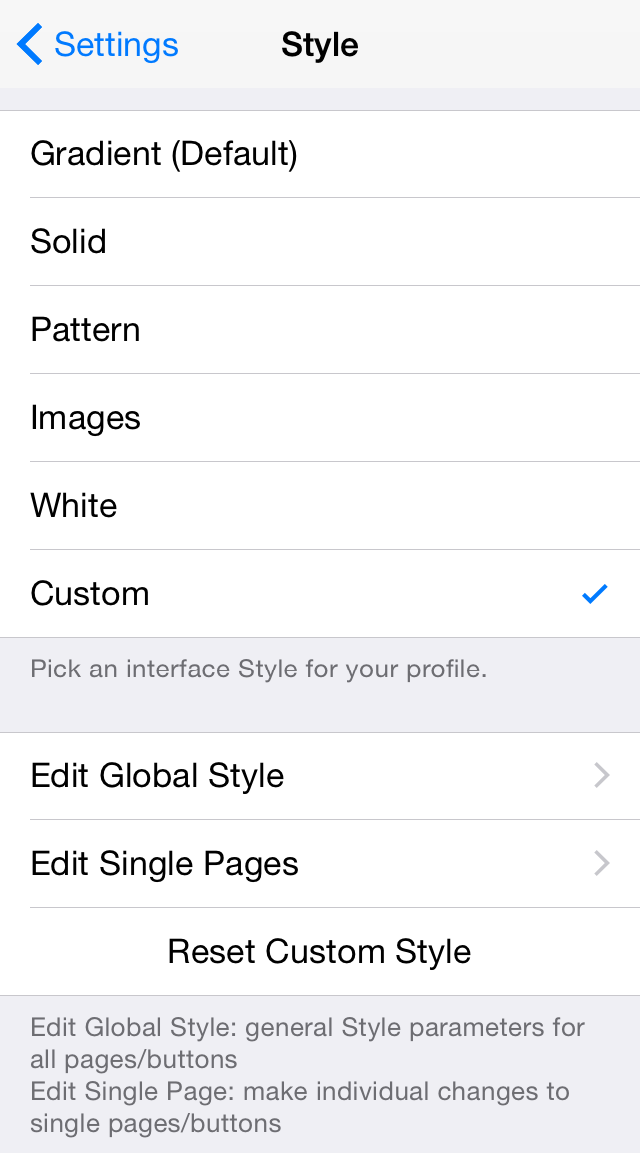
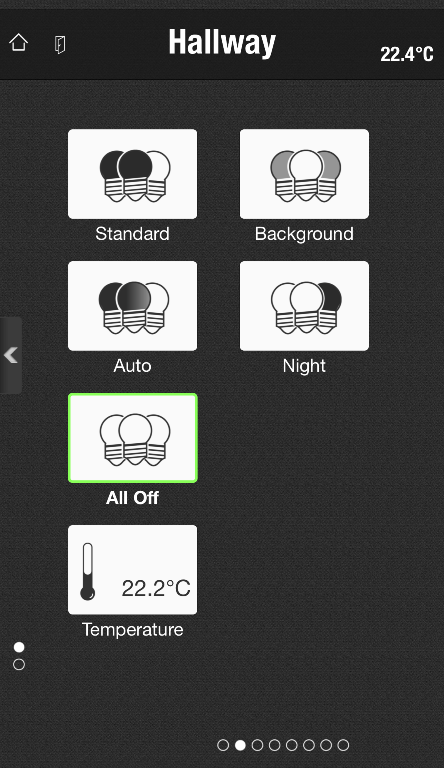
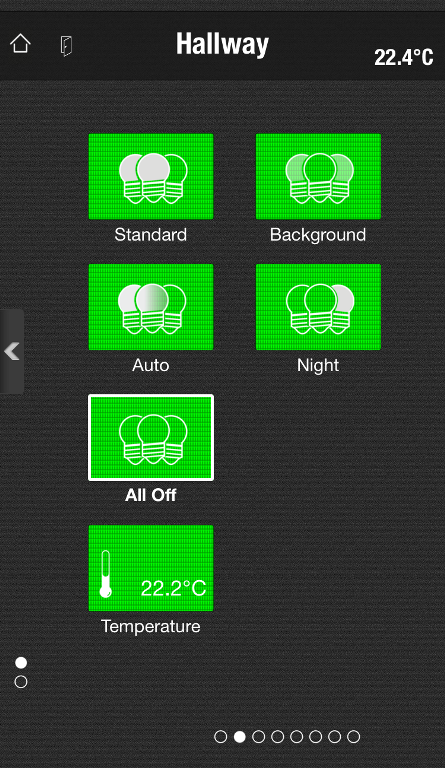
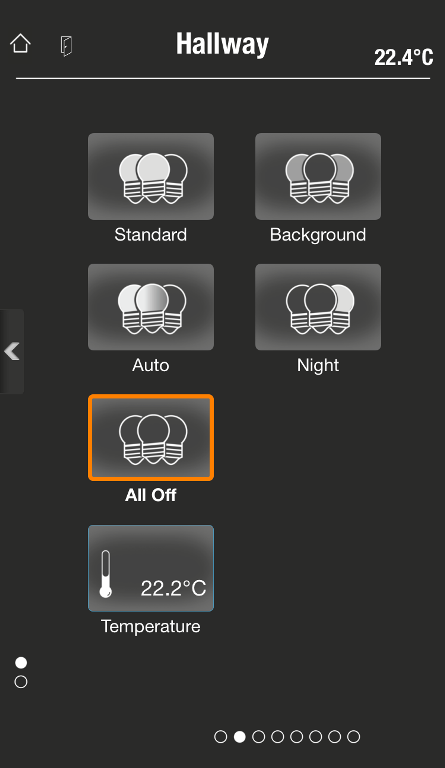
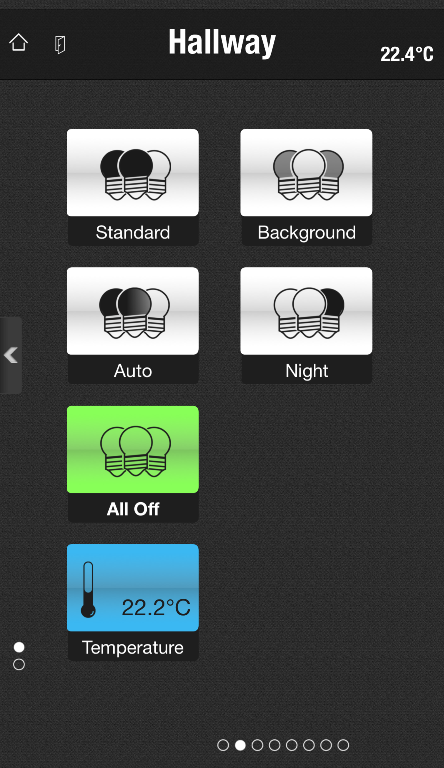
| iBEMI and iBEMI Light both offer you a wide range of customization to create your very personal remote control for your home! To change the appearance of your APP go to section Style in the App Settings. Here you find six different premade styles to choose from:
Style selection Image and Custom provide the possibility of further customization. With style Image you have to press Add Images at the bottom to add your own background images to your room pages. With style Custom you are completely free to create your own personal style. You find two options Edit Global Style and Edit Single Pages at the bottom to make your own composition. If you press Edit Global Style you will see the general style settings which apply to all pages and buttons in your profile. In the first section Colors you can modify the 20 color references which will be available for this profile and which you can choose from in the entries below (e.g. button color). With Edit Single Pages you are able to modify the appearance of single pages and buttons in the profile (- so that they look different from the style for the whole profile which you set in Edit Global Style). So if you want one certain button to be red and not blue as set in Edit Global Style you press Edit Single Page, navigate to the page where the button is and change the button color through the BUTTONS menu. Custom Style Notes: Custom Style is stored per profile: The Custom style is saved in the profile. So if you make changes to the custom style for one profile and you then change the profile, this profile will look different when you select Custom in the Style page. Reset Custom Style will reset all the parameters in the Style Setup for the current profile to the factory defaults. Saving Global Style: When you press Save in the Style Setup (Edit Global Style) you will be prompted a pop-up window with two options: Keep Custom and Apply To All. When you press Keep Custom, the changes that you might made before through Edit Single Pages (like changing the color of one button in the profile to red) will not be affected. So in this case this one button from before would remain red (side note: if this color reference was not changed in the global style). If you press Apply To All, the global style for the profile will be applied to all buttons and pages. Changes you might have made through Edit Single Pages would be gone. Profile Sync Warning: With Edit Single Pages you are able to change names and icons of rooms and buttons. So if you change the name of a room in the profile this is stored locally on your iDevice. In this case if you sync your profile, there will appear a pop-up window asking whether you would like to keep the room name which is stored locally (option: Keep Local) or if you would like to change it to the name which is stored in the original profile online (option: Update from Server). |

iBEMI Monitor
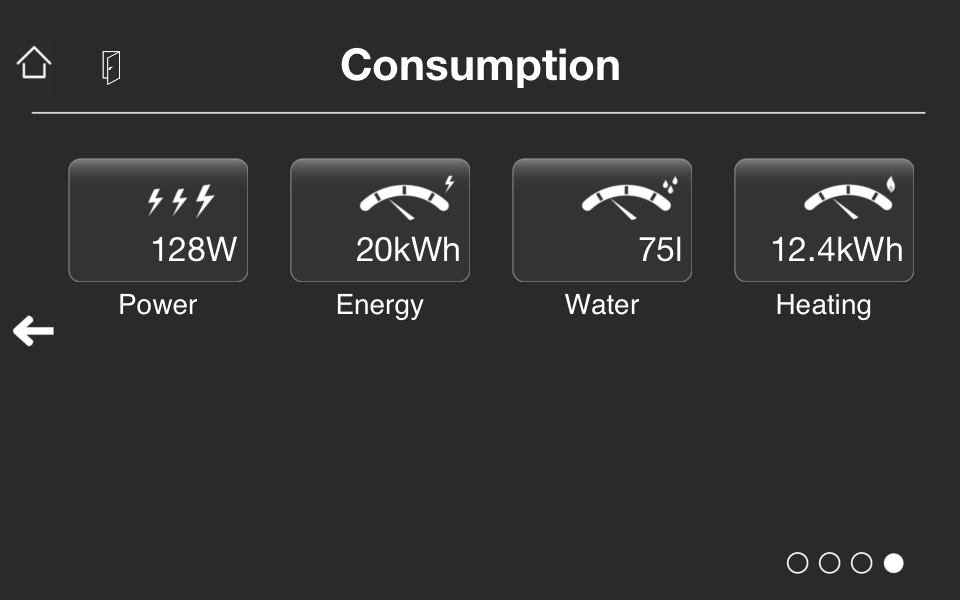
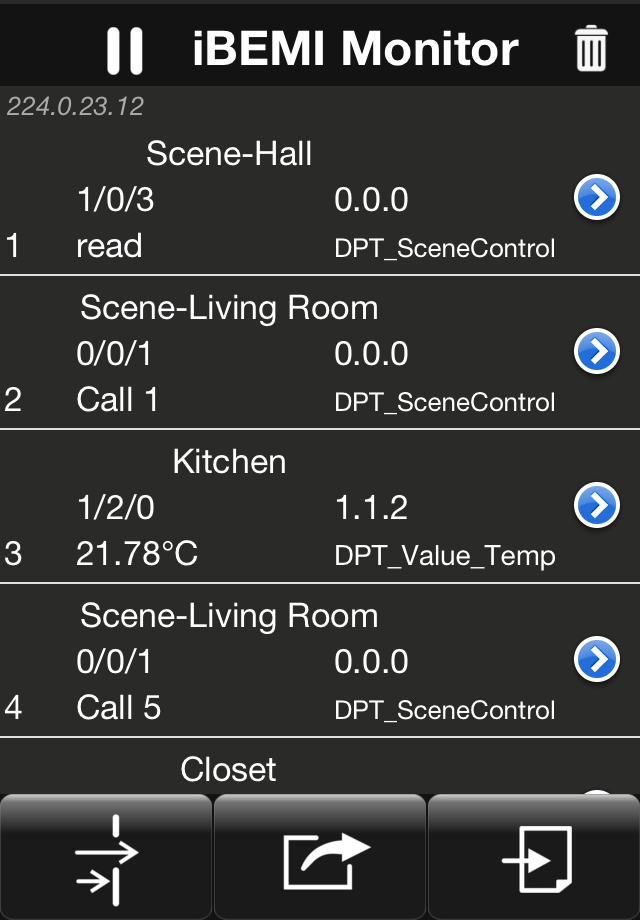 |  | Starting from version 2.0 iBEMI includes a great KNX Bus Monitor which helps you analysing and improving your KNX installation. The Monitor comes with a Filter tool, Send Message feature and you are able to save logs and send them via e-mail in ETS compatible format. Furthermore there is a special Long Time Recording mode available to capture large numbers of telegrams. Defaultly the Bus Monitor is added to the app. However, you can disable it for a profile in its Profile Settings to simplify the App Settings - Bus Monitor would not be listed there in this case. To access the Bus Monitor you need to set "Add Monitor to title bar" option in the App Settings (Note: This option is not available if Bus Monitor is disabled for the loaded profile as described before). Back in the App you then open the Bus Monitor through dragging down the title bar. You start recording telegrams by pressing Play button in the title bar. On the bottom bar you find three buttons for filtering log, sending message and saving log features. By dragging up from these buttons you will dismiss the Bus Monitor and come back to your profile. By pressing the Filter button on the left hand side the Filter menu will appear. This menu enables you to filter easy and fast for the content you'd like to see. There is also a fast filter function: if no feature is selected (neither Filter nor Send Message feature) and you select one message in the log, all messages with this KNX Group Address are highlighted - when you press the filter button, all the other messages are filtered away. It has never been so easy to track one KNX actuator! |
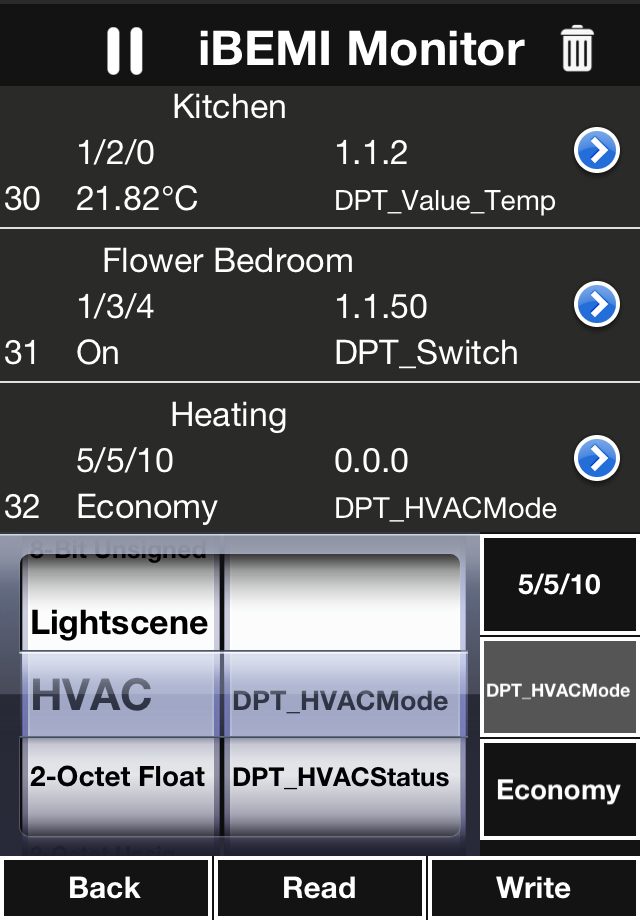
| The intuitive Send Message menu makes sending telegrams from 1bit switch value to 14byte text or a read request really simple. Tip: If you select a message in the log, the Send Message engine is adapting the attributes of the selected message. Try it out! In the Monitor you can access the message details by pressing the blue disclosure button on the right hand side. Here you are able to set a name and a KNX Datapoint Type not only for this message but for all messages with the same KNX Group Address. The Datapoint Type is set in section Data Format. Please note that it cannot be set at read request messages. In the Monitor log you are able to set names for group addresses so that you can easily allocate telegrams. In the Monitor setup you can select whether the button names of your currently loaded profile should be shown in the Monitor log for the corresponding KNX Group Address (that is the address of the button) or you could select blank name fields. This option is selected default and it is called Loaded Profile, the second option Blank won't assign any names to addresses initially. In both cases the name for an address could be customized in the telegram details. | 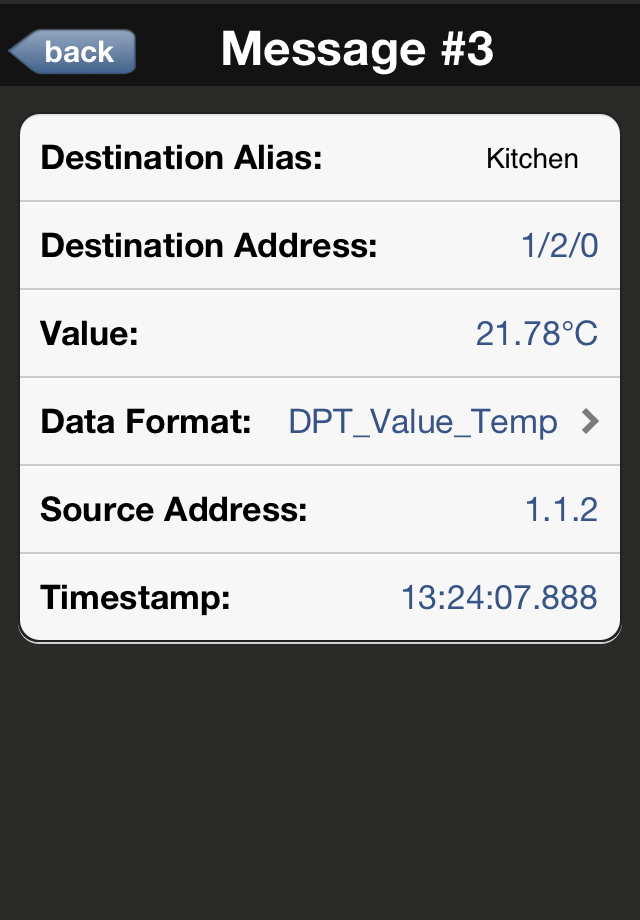 | 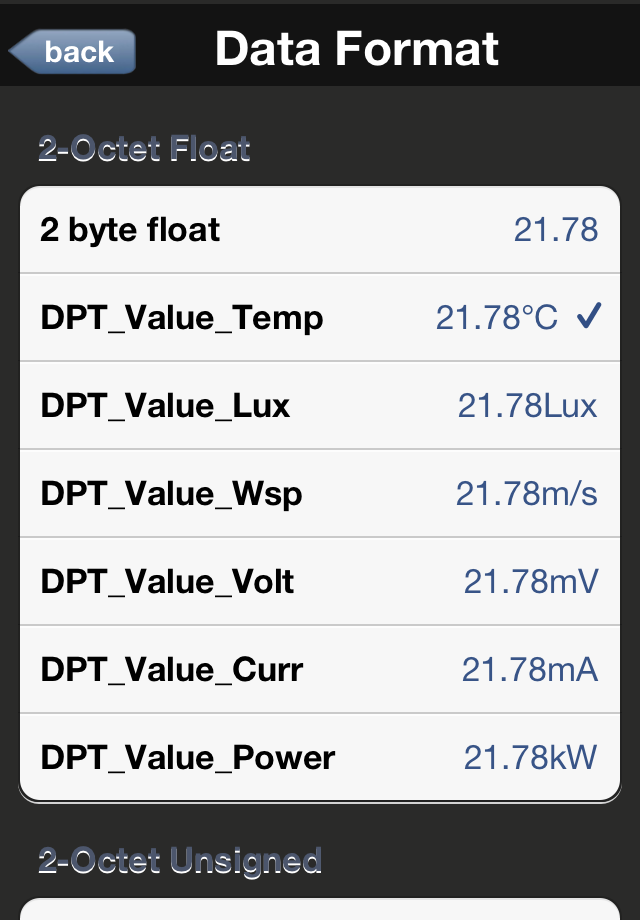 |
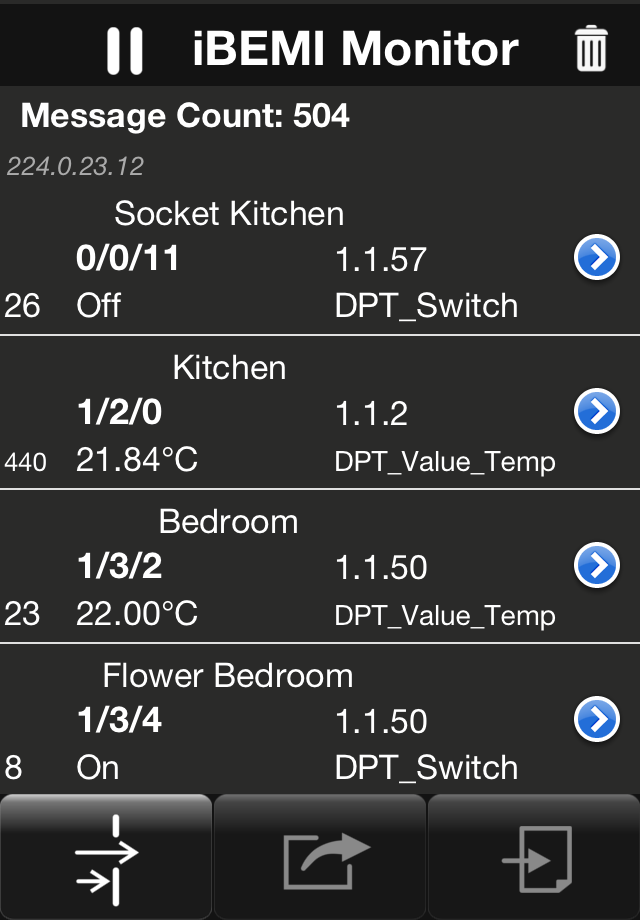 | The standard recording mode is limited to keep 5000 messages at a time. However, in the Monitor setup you find an option called Long Time Recording. The Long Time Recording mode is made to capture large numbers of messages. In this mode the interface of the Monitor is slightly changed to reduce system load and the log is directly written to an output file for higher reliability. Due to the same reason, the Send Message feature is disabled and also the Filter function is simplified. In Long Time Recording mode the Monitor window is showing the received telegrams ordered by group address. For each address it is printing the number of received telegrams plus the content of the last received telegram. In this way you also get a great overview of the current status of your KNX. Note: Please notice that the monitor is only recording when the app is active. So make sure to turn Off Auto-Lock of your iDevice when you want to record over a longer time period. |
Demo Mode
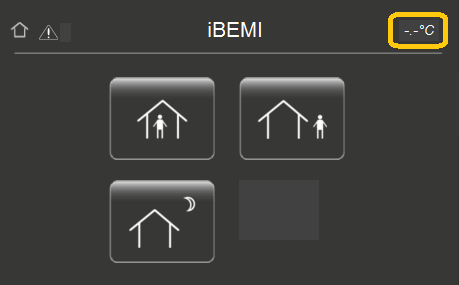
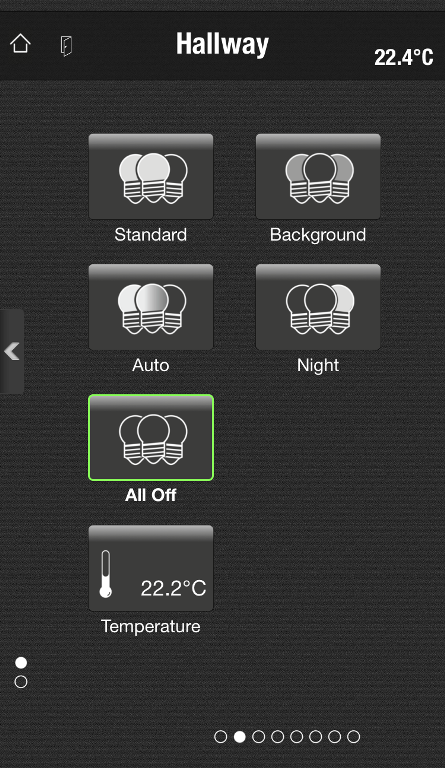
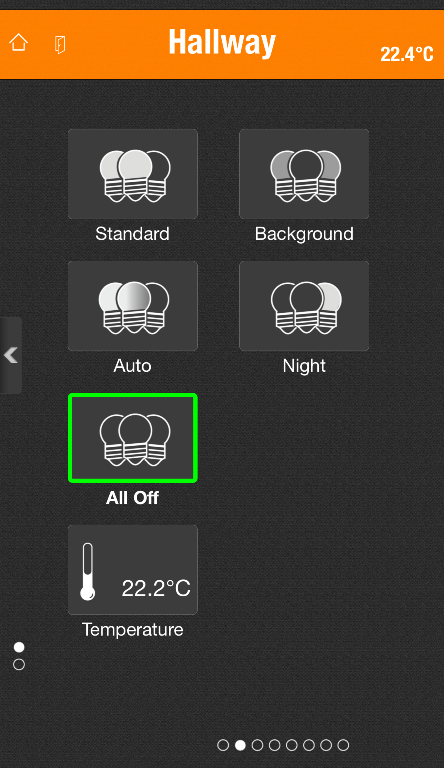
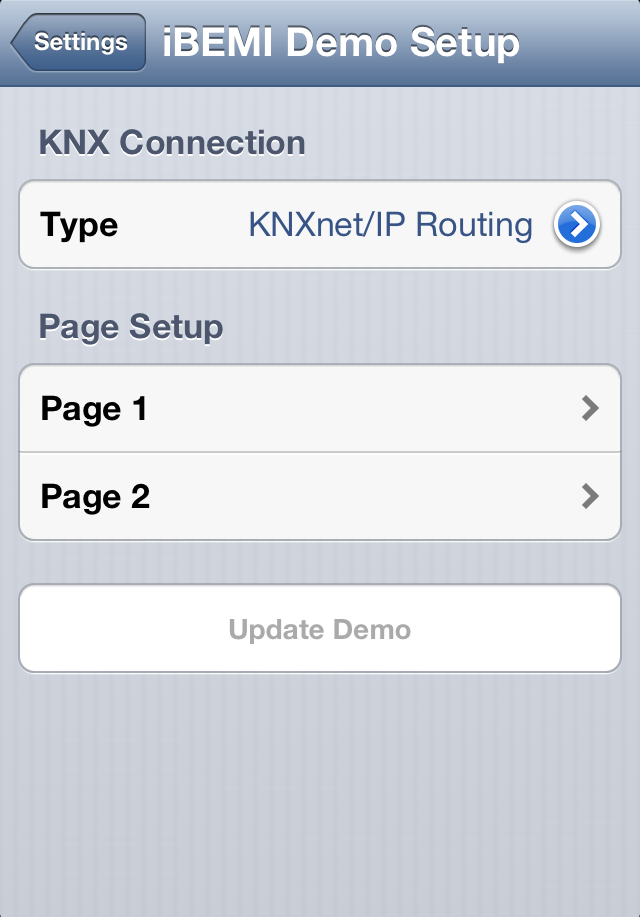
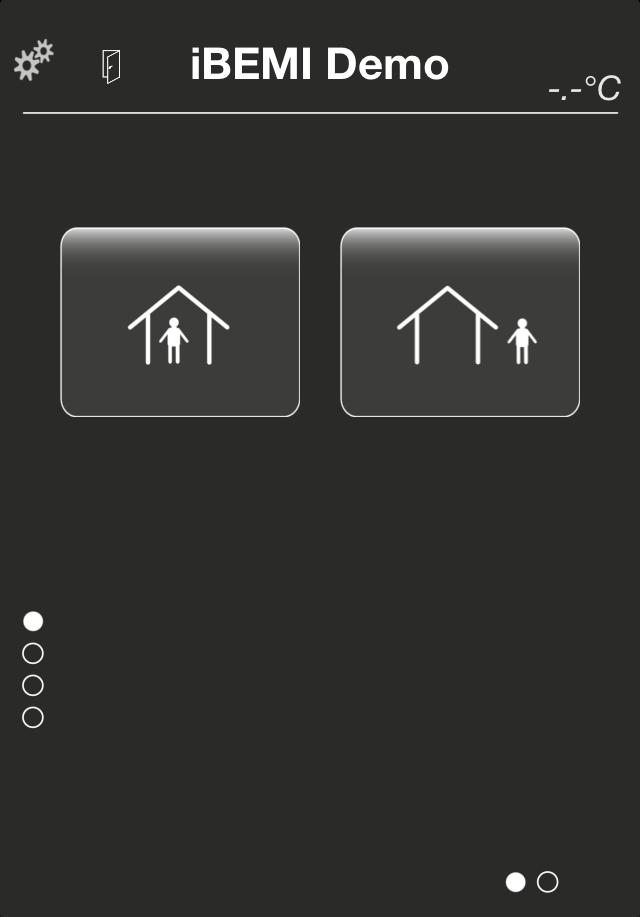 |  | If the iBEMI Demo Profile is loaded, you are easily able to configure the eight widgets on the first two pages in the profile to your needs. The configurable widgets are the ones on the first page (the two big buttons + the value in the upper right corner) and the five widgets (four buttons + the value in upper right corner) on the extension page to the right hand side of the first page. In the Demo Profile the KNX system is defaultly connected through KNXnet/IP Routing. You can configure these widgets to your needs with the In-App Configurator which you find in the App Settings under iBEMI Demo Setup. See the chapter below for detailed information. |
In-App Configurator
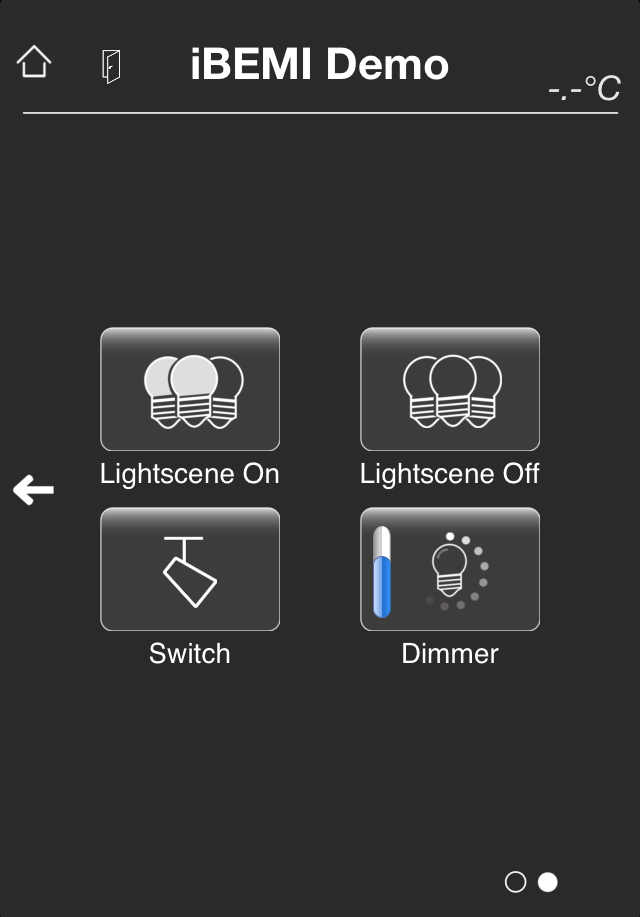
| The widgets on the first two pages of the iBEMI Demo Profile can be easily configured with the In-App Configurator. You find it in the App Settings under iBEMI Demo Setup. If you want to change the connection type to KNXnet/IP Tunneling, you have to enter the IP Address or URL of your KNXnet/IP gateway in section KNX Connection. The Multicast IP address for KNXnet/IP Routing can't be customized in the iBEMI Demo Profile. The widgets of a page can be configured in the respective page section. Page 1 is the first page with the two buttons, Page 2 its extension page which is placed to the right hand side of the first page. In section Top Bar in the Page setup you are able to configure the value which is displayed in the upper right corner of the page. In the Demo profile you are limited to either show a temperature or a brightness value there. In section Control Elements you can configure the buttons of each page. In the Demo profile you can choose from button function Switching, Lightscene and Dimming (1 byte) and adapt the different attributes to your needs. To keep it more simple and intuitive not all the parameters are listed that you could configure for the same element in the iBEMI Profile Editor. (e.g. for button function Dimming you can't set a separate KNX Group Address for feedback of value) Don't forget to press Update Demo in the iBEMI Demo Setup page to apply the changes you made. |
 |  |  |